|
Prolink to exhibit at EASTEC
Booth: 3224
May 19-21, 2009
Eastern States Exposition
Springfield, MA
Come visit us in the Young Building (Building #3)!!
|
|
Product Spotlight: SPC Office Buddy 3.2 now does Gage R&R
We recently added the ability to run Gage R&R reports in Minitab directly from
the Buddy. Simply open any QC-CALC Gage R&R study in the Buddy and
choose the Gage R&R Study or Gage R&R Run Chart from the Stats menu. The
Buddy will automatically populate the Part, Trial, and Operator values in addition
to the dimensions you have highlighted and run the studies directly in Minitab.
Gage R&R Studies in Excel Jobs
Want to run Gage R&R studies and place them in Excel using Excel Jobs? You can
place the graphs just like any other pictures into your custom Excel reports using
the tags. In addition, we will actually read the Minitab Session window and allow
you to place the Part Variation, Repeatability, and Reproducibility numbers anywhere
in your Excel Reports. Just make sure you add a Gage R&R Study to your report
so Minitab generates the GR&R numbers.
Just one more way the SPC Office Buddy makes your life easier!
How To Do It:
-
In the Buddy, open a Gage R&R study you have performed in QC-CALC using
File > Open
. The filenames for this
end in "_GRR.qcc" to help you identify one. By default, there is a Sample Gage R&R_GRR.qcc
file included in the QC-CALC Data directory.
-
Choose Stats > Gage R&R Study and watch the charts appear.
You can also choose Stats > Gage R&R Run Chart to see the
individual operator trials.
How To Get It:
If you have the SPC Office Buddy 3.2, then this is a free enhancement. Simply choose
Help > Run Update or download the update from our website and
start saving time on your Excel reports!
Want to Learn More?
Get the SPC Office Buddy 3.2 >>
|
|
Setting Up the Administrative Tool - An Easier Way!
As a refresher, the Administrative Tool allows you to centrally administer settings
across multiple copies of QC-CALC in your shop. You do this by creating groups in
the Administrative Tool and then choosing defaults and locked settings for each
group. Once the group(s) are created, each copy of QC-CALC joins one of your groups
and automatically inherits the settings of that group. When you change the settings
for the group, all participating copies automatically get the new settings. It's
a great way to standardize the settings of your QC-CALC copies without having to
walk around to each gage station or CMM.
To make it easier to set up, we have added a new 3 step wizard that will help you
through the one-time setup in QC-CALC. If you currently have QC-CALC 3.2 (Real-Time
or SPC) and do not see an Administrative Tools menu at the top, it means you aren't
currently using the Administrative Tools. Just make sure to update to the latest
revision of QC-CALC 3.2 so the feature appears.
|
How To Do It:
- Choose a central path where your administrative settings will be stored. This is
typically a department or corporate share on your network. Make sure it's a place
to which all QC-CALC copies will have access (such as an M:\ drive, etc).
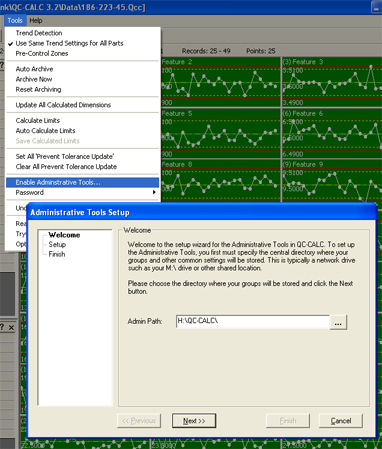
- Choose Tools > Enable Administrative Tools...
The wizard will appear.
- Type or browse to the administrative path you chose in Step 1 and click
Next >>.
-
- If this is the initial setup, you will be asked to type a new Admin password. Type
the password twice to confirm and click Next >>.
- If there is already an existing admin folder, you will be presented with a screen
that allows you to join a group. Simply choose the group from the list of groups
and click Next >>.
- Click Finish.
If this is the initial setup, the admin path you
chose will be initialized for the Administrative Tool.
If you joined an existing
group, QC-CALC will now display the group name at the top of the window. In either
case, the Administrative Tools menu will now appear giving you access to all Administrative
functionality (provided you have the Admin password).
|
|
How to Get It:
If you have the QC-CALC 3.2, all you need to do is click Help >
Run Update or download the latest update from our website.
If you have an earlier version of QC-CALC, then it's a great time to upgrade and
take advantage of all the new features in QC-CALC 3.2. You can download version
3.2 and install it into a different folder to try it out before upgrading since
they don't interfere.
|
Want to Learn More?
Intro to the Administrative Tool video >>
Get QC-CALC 3.2 >>
|
|