May 2007 Newsletter
Latest News |
|||
|
|||
|
|||
Spotlight: Enhanced Q-DAS Export
We have enhanced our export format to Q-DAS so that
virtually any K-Fields or values can now be sent to Q-DAS via a completely
configurable export. This is a part of our overall strategy to export to all
SPC software formats.
New Features
The new Q-DAS export screen in QC-CALC Real-Time now allows the following export possibilities:
How It Works
Simply export your QC-CALC data the same way you normally do any other export. If you choose Q-DAS without any configuration, you'll get the standard list of K-Fields. If you wish to add more K-Fields, click the Configure button on the Export Setup screen and add as many as you need. QC-CALC will save your configuration for future use either at the part level or globally (depending on your export settings).
Next Steps
If you have QC-CALC Real-Time 3.0, you don't need to purchase anything. Simply update your software via the Help > Run Update menu. Once you have updated to 3.0.230, the enhanced Q-DAS export will be available.
The new Q-DAS export screen in QC-CALC Real-Time now allows the following export possibilities:
- You can now map K-Field values directly to factor values and other common fields in a QCC file. This allows you to send trace data directly from your CMM to the Q-DAS K-Field of your choice without having to manually set the value or re-enter it in Q-DAS later.
- You can also link the QC-CALC fields to a reverse lookup in Q-DAS and output the Q-DAS index number to a K-Field rather than the actual value contained in the factor. For instance, the operator trace field may have a value of "Robert", but when it is sent to Q-DAS "Robert" is looked up in the catalog and the appropriate Q-DAS index number for "Robert" is sent instead.
- You now have the ability to use any of the standard Q-DAS catalogs to set your K-Fields. This includes the ability to send either the index value or text name to Q-DAS.
- You can now create/maintain your own custom catalogs for use across multiple parts within QC-CALC and then use these custom lists to export to Q-DAS K-Fields.
- You can now manually enter any K-Fields that are not passed through the automatic interface. This allows for any last minute values to be entered where getting the data from the inspection machine is just not possible.
How It Works
Simply export your QC-CALC data the same way you normally do any other export. If you choose Q-DAS without any configuration, you'll get the standard list of K-Fields. If you wish to add more K-Fields, click the Configure button on the Export Setup screen and add as many as you need. QC-CALC will save your configuration for future use either at the part level or globally (depending on your export settings).
Next Steps
If you have QC-CALC Real-Time 3.0, you don't need to purchase anything. Simply update your software via the Help > Run Update menu. Once you have updated to 3.0.230, the enhanced Q-DAS export will be available.
Tips & Tricks: Have Your Cake And Eat It Too!
New Feature Allows Archiving Of Machine Output Files
We have heard from a few customers who want to collect
stats data with QC-CALC, but also want to keep the inspection
results files after collection. This month's tip is an easy way
of saving your inspection stats files after QC-CALC collects the data. The
process is simple. Once the data in the results file has been collected,
QC-CALC Real-Time will copy the file with a date/time stamp to the directory
you specify instead of deleting it. The date/time stamp will ensure that
files with the same filename don't overwrite each other in your archive
directory.
How To Do It
1. Go to Tools > Options > Data Collection > Set Paths. At the bottom of the window is a section called Machine Data Archive Path (highlighted in red below).
How To Do It
1. Go to Tools > Options > Data Collection > Set Paths. At the bottom of the window is a section called Machine Data Archive Path (highlighted in red below).
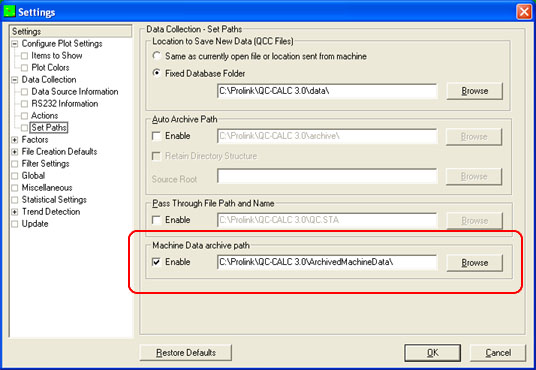
NOTE: If you do not see this section on the Set Paths
screen, please update to the latest revision of QC-CALC. It should be at least
3.0.230. To do this, click the Help > Run Update menu in QC-CALC
Real-Time.
2. Simply check the Enable checkbox and add the desired archive path to the text field. You can either type it or browse to it using the Browse button.
2. Simply check the Enable checkbox and add the desired archive path to the text field. You can either type it or browse to it using the Browse button.
3. Click OK and you're done!
Thanks!