PREREQUISITES
You must have Mitutoyo Measurlink Real-Time or Real-Time Plus installed and an accessible location on the Measurlink machine where files will be sent from QC-CALC.
It is recommended that you create a path on the Measurlink machine under the installation directory for Measurlink Real Time. You can create any folder you want. For this example, we recommend creating the following folder:
c:\Program Files\Measurlink60\QCCImport
QC-CALC will drop off the exported data into this directory and Measurlink will pick up the data from this directory.
INTRODUCTION
This article will go through the steps necessary in QC-CALC and Measurlink to set up an automatic export of data in order to get your QC-CALC data into Measurlink.
Note: This article only concentrates on the normal measurement fields in QC-CALC and unfortunately does not include set up to import trace factor fields. This setup is complicated in Measurlink and it is recommended that you call Measurlink Tech Support in order to import the trace fields into your Measurlink database. Also, the formats were obtained from Measurlink technical support. Any and all questions with Measurlink should be directed to their support department.
STEPS IN QC-CALC
- Go to Export > Setup Automatic Exporting.
- On this screen, choose Mitutoyo Measurlink from the Export Type drop down list.
- Choose the path to the Measurlink drop off directory. This should have been created above in the Prerequisites section.
- Choose Records Received Since Last Export in the range to export section.
- Choose New Records Received and type 1 in the text field for Frequency of Exporting. You can choose any frequency you want. This is just an example.
- Click the Custom button.
- Clear the bottom field with the output file name
- In the selection box choose "FN - Filename" and click the Add button. Put the cursor at the end of the "<FN>".
- In the selection box choose "CD - Current Date" and click the Add button. Put the cursor at the end of the "<CD>".
- In the selection box choose "CT - Current Time" and click the Add button.
- The output file name should now display as: <FN><CD><CT>
- This will ensure each export has a unique filename so we do not overwrite an existing file.
- Click OK to close the Custom File Name Editor, and then click OK again to close the Auto Export Settings window.
- Turn on Auto Exporting by choosing the Export > Automatic Exporting menu.
STEPS IN MITUTOYO MEASURLINK
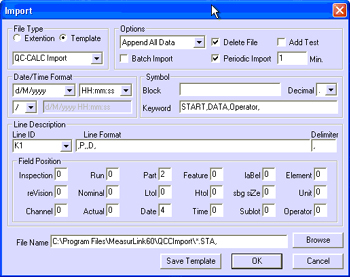
- In Measurlink, go to Tools > Import.
- In the File Type area, choose Template and name the template QC-CALC Import.
- For Options (just to the right), choose Append All Data. Make sure the Delete File and Periodic Import checkboxes are checked and add 1 to the Min. field.
- In the Date/Time Format, choose dd/MM/yyyy and make sure the "/" is chosen just below.
- In the Keyword field, type START, DATA, Operator,.
- In the Line Description area, follow these instructions very carefully or Measurlink will not do what you are intending:
- In the Delimiter field, type a comma - ,
- In the Line ID field, type K1.
- In the Line Format box, type ,P,,D, and hit the Enter key. The enter key is critical here and tells Measurlink to save the line. If you do not hit it, it will NOT work.
- In the Line ID field, type K2.
- In the Line Format box, type ,F,A,N,H,L and hit the Enter key.
- In the Line ID field, type K3.
- In the Line Format box, type K,,,,,X(3) and hit the Enter key.
- At the bottom in the File Name box type: c:\Program Files\Measurlink60\QCCImport\*.sta,. If you have created an alternate path, add that path instead.
- Click Save Template.
- Click OK.
Once you have completed the above steps, QC-CALC will begin dropping off the data every x parts. Measurlink should then automatically import the data into the Measurlink database once every minute.
MORE INFORMATION
If you have questions about the Measurlink software, please contact their technical support department at 630-723-3585.
More information can be found at www.measurlink.com.