INTRODUCTION
This article gives step by step details on how to import data from Minitab to QC-CALC. This article assumes that you do not already have a QCC database file created and leads you through the creation of the database.
PLEASE NOTE: If you already have a QCC file created, you can simply copy/paste data from Minitab worksheets directly into the spreadsheet view of QC-CALC SPC (provided that data editing is not locked). Be very careful doing this as you are overwriting your data.
STEPS
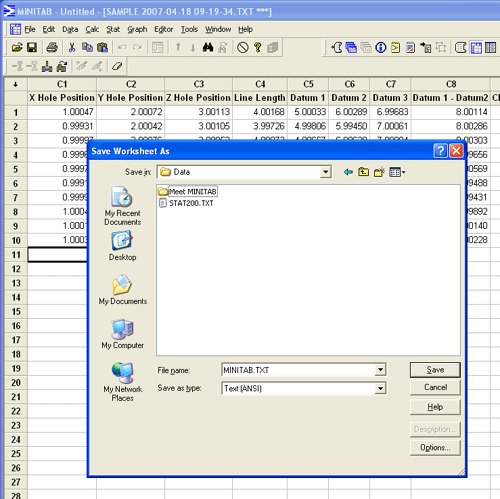
- In Minitab, count the number of columns of data you wish to import into QC-CALC. Go to File > Save Current Worksheet As... once you are finished counting.
- Choose Text (ANSI) as the File Type and save your output file to your hard drive.
- In QC-CALC SPC, choose File > New and name your new QCC database. (The following screen will then appear.)
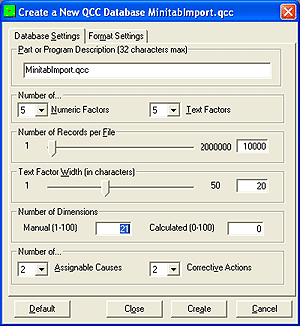
- In the Number of Dimensions area, type the number of dimensions you counted in step 1 into the Manual (1-100) field. When finished, click Create. (You will then be looking at a new database with a blank line of data.)
- Go to Tools > Import ASCII file.
- Navigate to the minitab export file you just saved and click Open. (The following screen will appear)
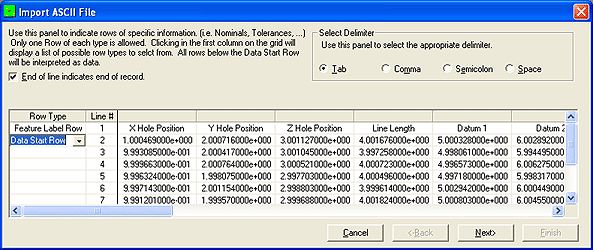
- Choose the Tab delimiter option in the top right corner.
- In the Row Type column of the grid, select Feature Label Row from the drop down in the first row. Select Data Start Row from the drop down in the second row. When finished, click Next.
- On the column assignment screen (below), highlight each column you want to import by clicking your mouse and dragging across the columns to highlight as many as needed.
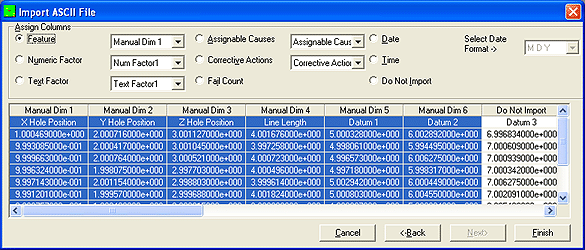
- Choose the Feature option in the Assign Columns area above and you will notice that it automatically replaces "Do Not Import" with "Manual Dim n" for all the highlighted columns at once. If you wish to do them individually, you can highlight each column separately and assign it to a dimension, factor, assignable cause, etc. Generally we recommend that you keep the same order as the columns were in Minitab, but this is not required. If you wish to skip any columns, simply leave them as Do Not Import.
- When finished, click Finish.
Your data will now appear in the rows and columns of the spreadsheet view of QC-CALC SPC. All of the data will appear red since there are no nominals and tolerances assigned. Unfortunately, you will need to do this manually as Minitab is not capable of exporting this type of information in a text file. You can change these by clicking Edit > Nominals and Tolerances and setting the nominal and tolerance information in that screen for each dimension. This is only done once during creation.
MORE INFORMATION
A quick way to import rows in an existing file is to highlight the cells in Minitab and copy them (CTRL+C). Then in QC-CALC SPC, you can simply place your cursor in a cell and paste the data from Minitab (CTRL+V). If you want to add new rows, choose Edit > Add Record in QC-CALC SPC, specify the number of rows to add, and click OK. This will add a set of blank rows to your QCC database. You can then paste the new rows in from Minitab.