This option allows you to export any range of data to various file formats immediately. Sending data to Excel, Access, or other programs, including other statistical packages, is simple. This way, you can use QC-CALC Real-Time as a translator between all inspection equipment and your SPC program.
General and Manual Exporting
You choose menu Export – Export Data and a dialog box asks:
- What Type of Export to do?
- Where and what file name to use?
- How much Data to Export?
Now let’s discuss each item seen in the Export Dialog box:
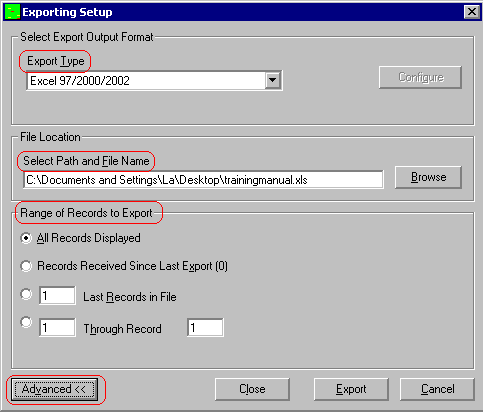
Export Types
QC-CALC Real-Time has many output formats but the list continues to grow. As of this writing the supported formats are:
Database Export Formats | SPC Export Formats |
ASCII File | Minitab |
Access (all versions) | JMP |
Excel (all versions) | Q-DAS (ASCII file) |
Lotus 1-2-3 | Q-DAS (ASCII file) |
ODBC | WinSPC |
OleDB | MeasurLink |
SQL Server (Advanced Method) | InfinityQS |
Stat Summary | StatGraphics Centurion IV |
Prolink XML | Visual SPC |
QMD XML Class 1 (Ver 1) | DataPage |
QMD XML Class 2 (Ver 1) | Lighthouse SPC |
QMD XML Class 3 (Ver 1) | Becker Reaction Plan Manager |
Clicking on the Drop-down list box labeled Export Type allows the export format to be chosen. The Configure button to the right of the Drop-down list is available if the chosen format is configurable.
Select Path and File Name
A complete file path and name must be provided in the Select Path and File Name text-box to specify where to save the exported data. The Browse button has been added to make this task easier by using a dialog box to choose the exact file instead of typing.
Range of Records to Export
You can adjust the amount of data to export using four different options. Controlling the amount of data is important so read these options carefully.
All Records Displayed
In this case, the number of points in each plot determines how much data is exported. This is controlled by Number Of Plot Points which is set in Tools – Options – Plot Settings, and allowing 3 to 100 points to be plotted.
If the Real-Time subgroup size is set to 1 then one point equals one part. However, if the Real-Time subgroup size is set to 2 and you are showing 10 points, then all 20 parts currently being displayed are exported. Deleted records are not displayed, and will therefore not affect the exported range.
Records Received Since Last Export
When you manually export data, QC-CALC saves the last record number exported. When this export option is used, QC-CALC uses this saved value to mark the beginning of the next export. All records received since this mark will be exported. This can be useful if something goes wrong during an export. The missed records will be picked up on the next successful export. Any deleted records will be ignored.
X Last Records in File
This option starts at the newest record (last written record) and counts backward until the Xth value is found. This is the set of record numbers that are exported.
The X most recent, non-deleted records will be chosen. Several deleted ones may be skipped. Ex. “5 Newest” gives you 3,4,5,8,9 with record 9 being the newest, and records 6 and 7 marked as deleted.
X Through Y
This option allows any range of records to be exported by entering the beginning record number in the first box and the ending record number in the second box. All non-deleted records between these two numbers will be exported, with all deleted ones being ignored.
Configure Button
You can configure some of the export file formats. As you choose the output format the Configure button may become enabled. This means you have choices and can control what to output.
Advanced Exporting Options
The Advanced Button
The normal Export dialog box can be expanded by pressing the Advanced button in the lower left corner of the screen. Pressing this button twice reduces the size back to normal. Several more options become available and are discussed here.
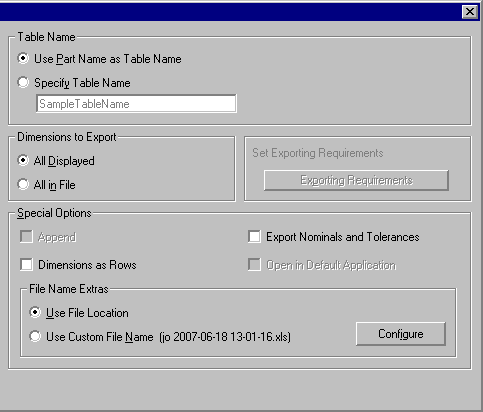
Table Name
If the chosen export output format is Access, Access 2000, or any of the Excel versions, then this area becomes active. You have the opportunity to choose the name of the table of an Access database or the sheet name of an Excel spreadsheet. The choices for naming are:
Use Part Name as Table Name
QC-CALC will use the name of your part as the table name.
Specify table name
Type a specific name other than the name of your part. Some characters are not allowed in Access or Excel, and they will be automatically replaced with the underscore character. This will not interfere with your exporting in any way, just keep this in mind if your file name is different from what you typed.
Dimensions to Export
You have the choice to export data from all of the dimensions in the file or only those that you are currently viewing.
Set Exporting Requirements
This button is enabled when you select an Export Format that may require special details or a specific directory to be created or a file to be copied. Clicking this button will perform any of these tasks that are necessary. This is a one-time action, although the button will remain enabled in case the files or directories get destroyed. This is a rare requirement and you may never need this option.
Special Options
Append
The Append check box is available only when ASCII text file is selected as the Export Format. When checked, all data is exported to your chosen file and is added to the end of the existing file (appended). Note: If this option is not selected and an export occurs, the existing data in the output file is overwritten.
Dimensions as Rows
The check box labeled Dimensions as Rows applies only to Microsoft Access or Excel export formats and will not appear if any other export formats are selected. This is an option to export the data sideways, with record numbers as the columns and dimensions as the rows. This was created for files containing more than 255 dimensions which is the column limit in an Excel spreadsheet or Access table.
Export Nominals and Tolerances
This option is available only for Excel and Access export types. It causes the first three rows of a new table to be filled with the Nominal, Plus Tolerance, and Minus Tolerance of each dimension.
Open in Default Application
When this option is enabled not only will QC-CALC export the file to your desired location, but it will also launch the application needed to run the file type that you specified.
File Name Extras
During normal export, you specify the output file name using the File Location textbox. This name also includes a file path or folder. There are times when you may want the exported file name to be variable based on a Factor Value, the Date and Time, or typed in text. This option allows you to select what the final file name will be at export time.
Use File Location
With this option the File Path and Name in the File Location textbox is used. This is the normal operation of QC-CALC export.
Use Custom File name
Using this option allows you to create a dynamic file name from the Factor Values, Part Name, the Date Time the part was inspected, or combinations of all of those options.
- Use Part Name, Date, and Time
- Date or Time of Inspection
- Part Name
- Any Numeric or Text Factor value
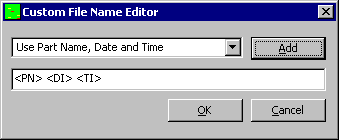
Simply select the item from the dropdown list and click the Add button. If you know what you want, you can manually edit the text into the lower textbox. At Export time, this name is used for the export file name.
Automatic Exporting
Besides manually exporting data discussed in the previous section, QC-CALC can export data automatically. With automatic exporting you setup what and when to export and then turn-on the automatic facility. Everything you learned in the previous section on exporting apply in this section so we only discuss the automatic portion of the “when-to-export”. The automatic export option is made up of four separate functions which include:
- What Type of Export?
- Where to Export?
- How much Data to Include?
- When to trigger the Export? 🡨 now add the “when”
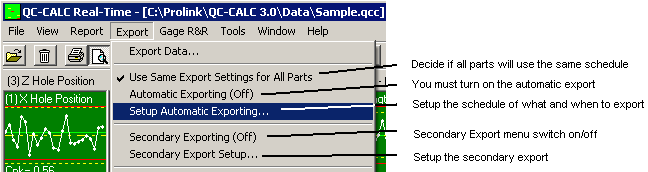
Enable Automatic Exporting
The first thing to do is turn on the automatic exporting by selecting the Export – Automatic Exporting (Off) menu. The caption switches from (Off) to (On) which indicates if the the Automatic Exporting is enabled or disabled. When this menu item is “checked” Automatic Exporting is enabled.
When the Automatic Exporting is ON (checked), QC-CALC obeys the schedule you setup in Setup Automatic Exporting… For example, if you setup an export to Excel every 5 parts a counter is displayed in the lower tray indicating you have enable the automatic exporting system and a count begins to show your current status.

After the first part is received, you see the message change from Exporting: On to Exporting: 1 of 5 and the counter displays your current count in the sequence. In the figure below you see 1 of 5 parts have been received and QC-CALC needs four more parts before the export occurs.

When enough parts have been received and the counter reads (5 of 5) the export is completed.
Automatic Export Setup
When you decide to use Automatic Exports for a part you are inspecting, you must setup or edit a configuration screen to tell QC-CALC what to do. You do this by choosing Export – Setup Automatic Exporting… and the configuration screen appears asking you to setup the schedule.
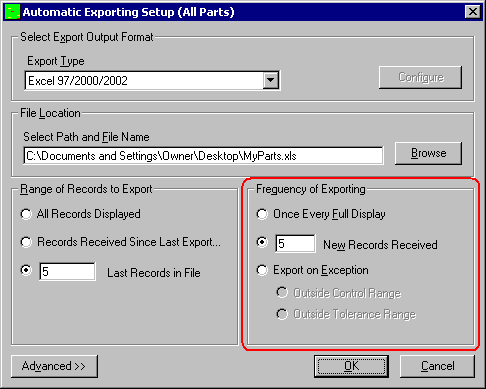
Frequency of Exporting
We already discussed most of this screen but the new section added called Frequency of Exporting requires explanation. The frequency of exporting deals with how often an export occurs.
Once Every Full Display
The Number Of Parts to Plot is set in Tools – Options – Configure Plot Settings – Items to Show, which allows you to plot 3 – 100 points. It is this value that is used to determine how often to export. You set the number of points to be displayed and how many points to export in the output file.
If the Real-Time subgroup size is set to 1 then one point equals one part. However, if the Real-Time subgroup size is set to 2 and you are showing 10 points then 20 parts must be received before the export occurs.
X New Records Received
This option is simply used to trigger an export after every X number of parts are received. The subgroup size has no effect on this option.
Export on Exception
This option allows you to export the data only if a problem occurs. For example, if you want to export the data to Excel when a Control Limit is exceeded choose the Outside Control Range button. If you want to export if a Tolerance Limit is exceeded, choose Outside Tolerance Range.
Use Same Export Settings for All Parts
When you decide to use Automatic Exports for a particular part that you are inspecting, you must setup or edit a configuration screen to tell QC-CALC what to do. Each part program you write has its own export schedule saved in the QC-CALC file. This means you can have a different export for every part type. Although it is easy to setup the export schedule, you may want the same export regardless of the part being inspected. To establish one export for all parts, select Use Same Export Settings for All Parts then Setup Automatic Exporting… Whatever you choose in the schedule will be the settings used across all parts.
Export Automatic Data Now
After you have established an export schedule and parts are being received, you may want to export the data early. For example, if you setup an export schedule to export an Excel output every 10 parts and want to export the data after receiving only 7 parts, simply choose this menu option. If you need to generate an export on older data, use the method discussed earlier in this section.
Reset Auto Export Counter
This feature allows you to reset the count of your Automatic Exporting. This means the export will not occur until the full count is repeated. For example, let’s assume you setup a schedule to export after 5 parts are received. After collecting two parts with Automatic Exporting turned on, you chose to reset the counter, the count would be cleared and start over. In this example it would take 7 parts to be received before an export occurs.
Secondary Exporting
There are times when you need your inspection data exported to multiple formats. The secondary exporting is setup the same as the primary export but they both share the same trigger. This means the secondary export will occur based at the same frequency you set for the primary export. You will note the Frequency of Exporting is disabled (grayed out) since it is not used.
In order to use the Secondary Exporting you must click the Export – Secondary Exporting menu to enable this functionality. All configuration for this is done by clicking the the Export – Secondary Export Setup menu and choosing the options.