This article describes the steps necessary to configure the Visual Part Report for your own use. The Visual Part Report is a useful new report type that was added to allow you to mix SPC data plots with a picture of your part on the same report. Each feature can then be linked via a leader arm from the plot to the actual location of the feature on the part.
The Visual Part Report can currently handle up to 30 features simultaneously. These are spread across 3 pages with 10 features on each page. Each page is stored as a layer in the report enabling you to have a different picture and different leader arms for each page.
In this article, I will use the same picture for each page, but all you have to do is click on the different layers and choose different pictures for each of your pages.
Steps
- In QC-CALC Real-Time, choose Report > Design Template.
- In the selection box, choose any report that has the extension .vpr. A sample report called DSConsoleShifter.vpr has been included as a starting point. You can either double-click the report or click once and then click Open.
- Choose File > Save As... and name the report something that makes sense to your organization.
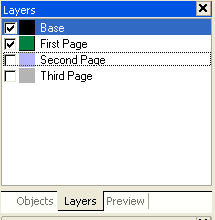
- In the Report Designer, you should see several sub-windows. Click on the one that says Layers. If you do not see this panel, choose View > Windows > Layers. Make sure this menu is checked and the Layers panel will be visible. Please note that it may be a tab in a group of panels. (image on right)
- Each page is a layer in the report and is color-coded according to the colors in the Layers panel. Start by checking only the first page. Uncheck the others. The main part of the screen with the report should now look green. Select First Page with your mouse so it highlights the whole label.
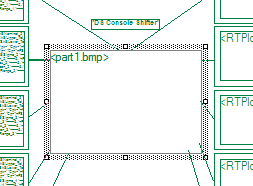
- Now select the part1.bmp picture box in the middle of the client area (image on right). When you do so, the Properties box should fill with properties. If it is not showing, choose Objects > Properties to make it appear.
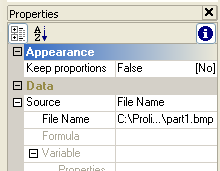
- In the Properties box, change the Source File Name to the image of your choice (image on right).
| 
|
- At the bottom of the main client area, click the Layout Preview tab to see your image and the leader lines.
- To redraw the leader lines, highlight each line on the image and drag the corners to point to the correct feature on the picture.
- Save your changes (File > Save).
- Repeat steps 5-9 for each of the 3 layers (First Page, Second Page, and Third Page). With each page, uncheck all the other pages and only check the page you want to edit on screen. Then select the page in the Layers panel so it is highlighted. Save often!
| |
More Information
You can also change the labels at the top. They are part of the Base layer (not the pages). Check and highlight it as you did the others, and double-click the labels to bring up the Report Designer's edit window.
You can create as many Visual Part Reports (for different parts) as you would like by choosing File > Save As from the Report Designer window.