Introduction
The general goal of Prolink reporting is to target and deliver reports via a web interface (QC-Mobile) so users within the plant can consume the reports in an organized, self-serve manner. It has been found that emailing reports as attachments causes "Inbox Overload" and the reports are often lost. Furthermore, some companies do not like emailing PDF attachments to users due to the risk of the user forwarding the attachments to email addresses outside the company network. Finally, attaching large reports can be problematic due to virus scanners removing attachments, inbox storage limits, and attachment size limits. Storing the reports in the database and consuming them via a website makes this process easier and more organized.
The vision is to set up groups of users that consume the viewable resources being generated by ERS, QC-CALC, and SPC Office Buddy. Then use the ownership and "view" settings to share the resources across multiple groups. The groups are overlapping meaning that users in ERS/Mobile can be in more than one group. Hence, if there are 10 reports spread across two groups (5 and 5), then some users will see only 5 reports. Others may see 10 if s/he is a member of both groups.
Fortunately, as of Prolink's 4.0 product line, all of this is possible assuming you are using SQL Server as the backend. This is not yet supported for QCQ files since they are disparate without a central database for storage. In QC-CALC Real-Time, the ability to upload reports to QC-Mobile is available via either Trend Reporting or Auto-Reporting. It is not available in manual reporting since it is assumed that these are ad-hoc reports and should not be cluttering up production report repositories. In SPC Office Buddy, any Excel Job can be uploaded to QC-Mobile.
Terms
Viewable Resources - Any consumable resource that is created in QC-CALC, SPC Office Buddy, or ERS. These include report output (ERS), export jobs (ERS), automatic reports or auto-trend reports (QC-CALC), Excel Jobs output (Buddy), Full Views (ERS), Dashboards (ERS), Snapshots (ERS). All of these are generated in their respective products and viewable as a resource through QC-Mobile.
Steps
In QC-CALC Real-Time Auto Reporting/Trend Detection:
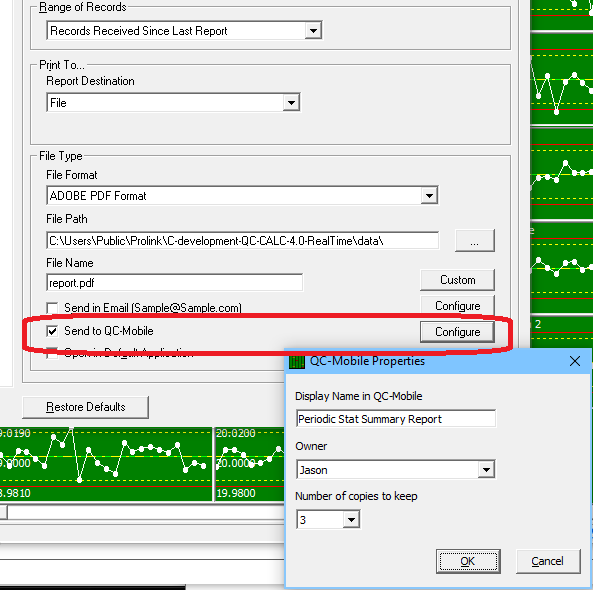
- In both Auto-Reporting Setup and Trend Detection Setup > Report and Log, there is an extra checkbox beneath the Send in Email checkbox called Send to QC-Mobile. This will be enabled if the data storage setting in QC-CALC is set to SQL Server.
- To upload the reports to QC-Mobile, simply check the box and click the Configure button.
- A popup dialog will appear with 3 fields; the name of the report, the owner, and the number of copies to retain. The name is the text description that will appear with any hyperlinks to the report itself. The owner will need to be any current ERS user. Since all viewable resources (reports, dashboards, etc) in ERS/QC-Mobile are owned by a user, QC-CALC reports also need to be owned by someone. The number of copies to retain allows the report to cycle through and be deleted so as not to overload the database with a lot of old data and reports.
- Click OK on the dialog and OK on the Auto Reporting or Trend Detection setup screen.
In SPC Office Buddy:
- When creating an Excel Job, the Delivery screen of the Excel Job Wizard includes the same fields at the bottom with the exception of the Display Name field. In Buddy, the Excel Job name is used for the report name.
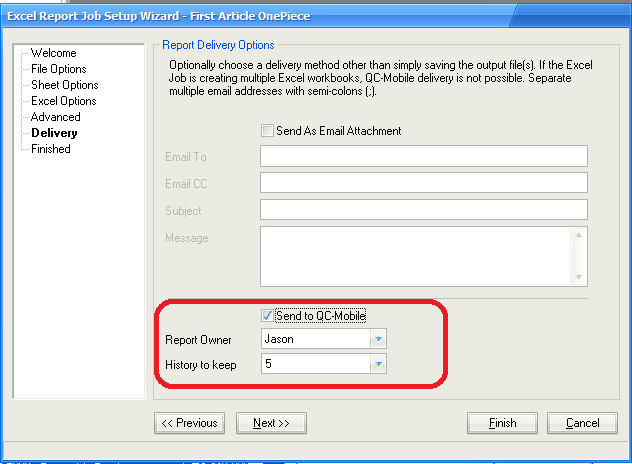
- Choose the owner and number of copies to retain.
- Finish the Excel Job Wizard per normal.
More Information
In QC-Mobile, reports that are visible for users are those that are either "owned" or "viewed" by that user. The example above, creates a report that is owned by Jason so only Jason would be able to view it in QC-Mobile upon login. A best practice with ERS/Mobile is to set up groups of user accounts by department or other logical business group level. Then create generic users to match and make the generic users the owners of viewable resource (reports, dashboards, snapshot) output. In the ERS Administrative Tool, edit the group that should have view access to the resource and add it to the group's view via the Assign Resources tab. All users of that group will then have the resource in their view.