Introduction
Often you will have a part where most of the features are measured on a CMM, but there is one extra feature requiring a hand-held gage for final measurement. Rather than create two different part files and group them later, all you want to do is enter one value for each inspected part. To do this, you will use manual characteristics in QC-CALC Real-Time. Manual characteristics allow you to type a final measurement to complete the inspection of the part and include this data alongside the machine-measured features of your part.
This article will explain the steps of adding a manual characteristic to an existing database using QC-CALC Real-Time. Creating a manual characteristic is a bit different with QC-CALC SPC, so please read the related article for a description of this process.
Prerequisites
Normally you will want to have at least one part measured on the CMM already in QC-CALC. Although it isn't required, this will pre-fill all the machine-measured features and makes it easy to add the manual characteristic.
Directions
- Inspect a part on your CMM and watch the data appear in QC-CALC Real-Time.
- Choose File > Properties... > Modify Database Structure...
- On the Modify Database Structure screen, click the Database Settings tab.
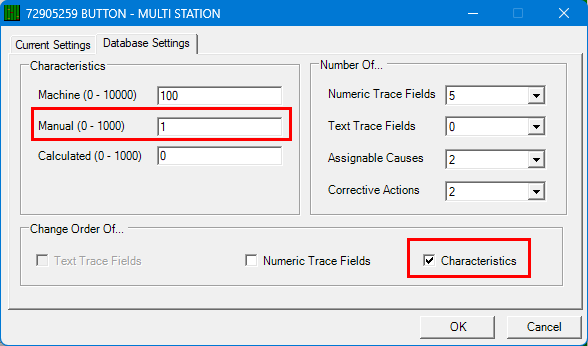
- In the Manual Characteristics box type the number of Manual Characteristics desired. For this example, let's use 1.
The new manual characteristic will be added as the last characteristic. You can also change the order by selecting Change Order Of... > Characteristic.
- Click OK. A Characteristics window will appear with two lists and your new characteristic on the left side.
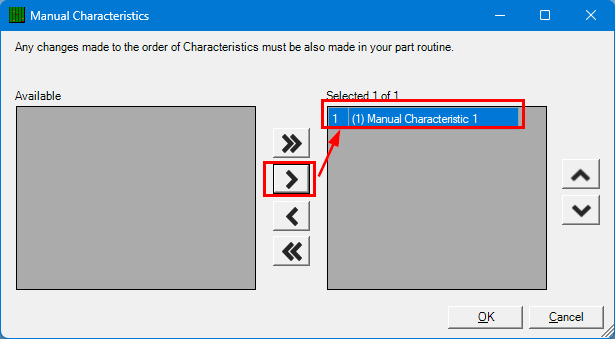
- Select the manual characteristic on the left and click > to move it to the right.
- Click OK. If you chose to change the order of the characteristics, you'll get a similar window to let you select and change the order of your characteristics. When you're finished, click OK. You'll notice the plots redraw themselves and the manual characteristic is added to the end with values set to nominal.
- Press the F7 key to open the Edit Nominals & Tolerances window. Select the manual characteristic in the list of characteristics.
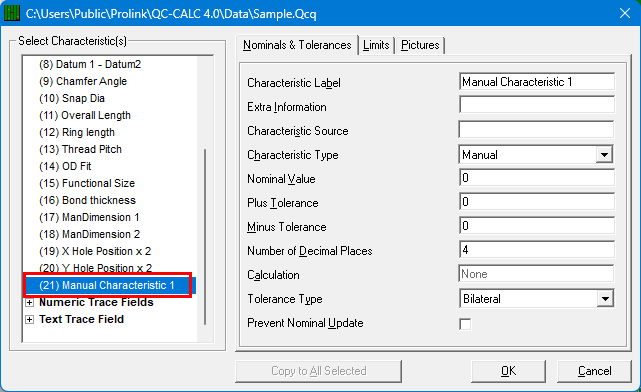
- Enter a name for the characteristic by typing in the Characteristic Label field.
- Add the nominal value to the Nominal field.
- Add the plus and minus tolerance information in the space provided. For example, if your nominal is 1.0 +/- .05, type .05 in the Plus Tolerance field and -0.05 to the Minus Tolerance field.
- For Upper and Lower Control Limits, use Nominal + (80% of the tolerance) so the plot scales correctly. Using the example above, you would enter 1.0 + (0.05 * 0.80) = 1.04 for the Upper Control Limit and 1.0 + (-0.05 * 0.80) = 0.96 for the Lower Control Limit.
NOTE: You can calculate the statistical control limits once you have some data. For now, just use these numbers for your starting point.
- Select OK to save your changes and return to the main window. You're now ready to enter actual values for your manual characteristic.
- Choose View > Manual Characteristic Values. The Manual Entry grid will appear at the bottom of the screen. For each part measured, there is a cell to enter the actual value.
- For each part, enter the measured value and press the Enter key after each entry to move to the next part. As you enter the data, the plots will change to reflect the new values.
Conclusion
You now have a Manual Characteristic and a quick way of getting data into your QCC file even though it was not received from the CMM.