FACTORs are used to track additional pertinent information about each part. For example, you can edit Numeric FACTOR1’s label to read Lot. This will help identify the origin of the stored data. Each time a part is inspected on the measuring machine, the Factor information is saved with the part. In later analysis, you can plot all data values using the Factor as a filter criterion thereby extracting a subset of the database. For example, you can analyze all parts made in Lot 6 or all parts made in Lot 6 by Operator John.
Some inspection equipment can send this extra non-measurement information to be saved in the QC-CALC Factors but others cannot. This functionality within QC-CALC was provided to handle cases that cannot be sent from the inspection machine.
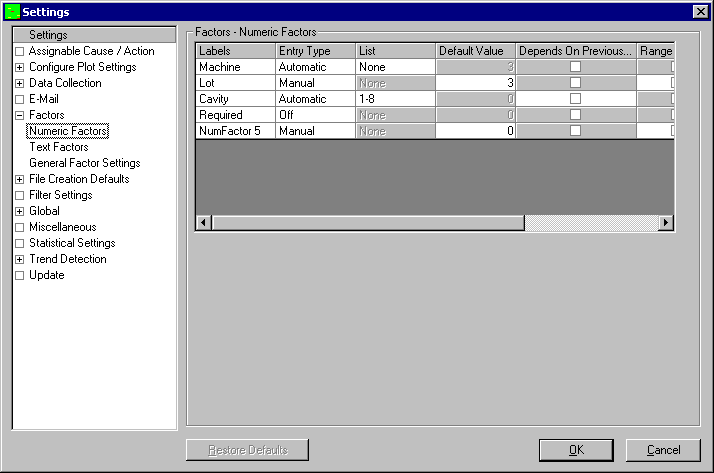
Factor Screen – Setup
This screen is used to create and add Factor values from within QC-CALC Real-Time and save them with the incoming parts. To do this you must setup QC-CALC so it knows what to add to incoming parts. To see the Factor setup screen select Tools – Options – Factors and a similar screen to the one in the figure below is displayed.
Factor Value Screen
After setting up the Factor values to be added to your incoming data you must display the values to the operator. To see your Factor values select View – Factors Values and QC-CALC displays them at the left side of the screen.
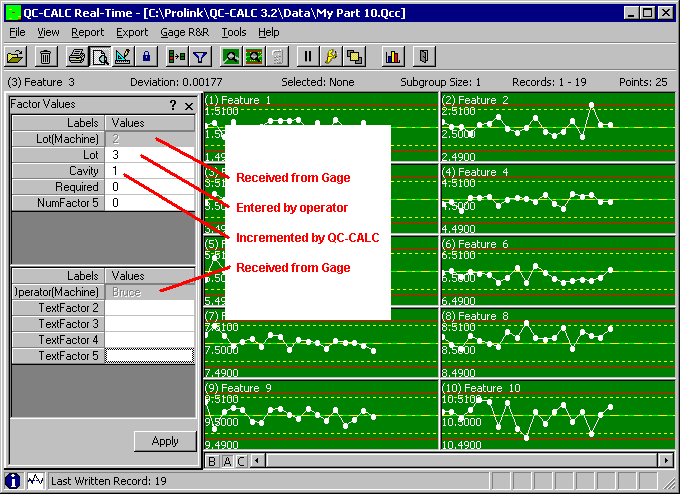
You can see the Factor values during data collection by viewing the Point Properties but the Factor Value screen allows for easy editing. Certain values are grayed out and un-editable. A grayed out Factor means the source of the value is automatic or coming from the inspection machine. These two types of Factor sources cannot be overwritten because they have a higher priority than hand entered values.
A close-up of the Factor Value screen shows the first Factor, labeled Lot (Machine), and is grayed out and not editable. The word (Machine) indicates the value 2 was received from the CMM Machine and cannot be overwritten. Similarly, the third Factor labeled Cavity/(Automatic) is grayed out. This value is being supplied from a list within QC-CALC itself. This Factor source is also not editable.
Because QC-CALC has 3 different sources of Factor values, all of which could occur simultaneously, a priority system is needed where you tell QC-CALC which Factor source you consider the highest priority. This priority system is discussed in detail in the General Factor Settings section below.
Factor Setup – Numeric
Column Headings Definition
The next few paragraphs describe the columns in the setup area and their usage for automatic or manual Factors.
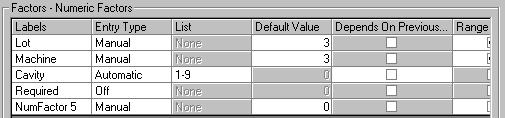
Labels
You enter a descriptive label from 1 to 32 characters describing the Numeric Factor. The label is entered by clicking in the area provided. Type over the Initial value of NumFactor 1 with your label.
Entry Type
There are 4-different methods of setting up QC-CALC’s automatic Numeric Factors. Once you understand these methods we’ll discuss the options associated with each.
None | This is the default setting and simply means no Numeric Factor information is added to your incoming inspection data. |
Manual | As the name implies, you manually enter the data in the Factor Value screen and the value is added to your inspection results as parts arrive. This process continues until you turn off the Factor or change the value. It is simple to use but the disadvantage is it is easily forgotten and may add old settings to new data. This entry method appears on the Real-Time Factor screen as an editable text-box that can be changed at any time. |
Required | When a Required method is used, QC-CALC automatically displays the Factor entry screen (if not already displayed) when a part arrives requiring you to enter a Factor value. This method ensures the operator does not forget to insert or add the value before continuing. Data collection is paused until the value is entered. Again, this entry method appears on the Real-Time Factor screen as an editable text-box that can be changed at any time. |
Automatic | This method of entering Factors allows you to build a list of values to be used one after another as data is received from the CMM. This is the only entry method requiring that you create or select a list of items; therefore, the List column is enabled when you select this method. This entry method appears on the Real-Time Factor screen but is NOT editable. |
Special Note | If the Factor values on the Factor Value screen are grayed out and not editable it means the values are being sent from the CMM or another source and you cannot override them. The priority of Factors is discussed in the General Factor Settings section below. |
List
The Automatic Factor Entry Type just discussed requires you to select a list of values to use as inspection data is received. Click the List column with your mouse and a small gray square becomes available. Click on the gray square to see all available lists.
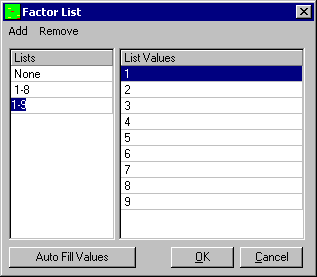
Add | The Add menu brings you to the Add List or Add Values |
Add – List | Choosing this adds a new list name to the Lists column and waits for you to name it. It has also added an item in the list. The new list values can be changed by clicking on them and typing in the appropriate box. |
Add – Value | Adds another entry in the List Values column of the currently selected list. |
Remove | The Remove menu shows you the List or Value. |
Remove List | This is a quick way to delete the selected list. |
Remove Value | Will remove the currently selected value in the List Values column. There must be more than two values in the list for this operation to be available. |
Auto Fill Values | This button gives you a quick method of entering a range of numbers without having to type them. Just enter the starting and ending values for your range of numbers and QC-CALC will create the list for you. Be sure to use the Replace option to create a new list or the Append option to add to an existing list. |
Default Value
If you enter nothing this value is used by default.
Depends on Previous
You check this option if you want the incrementing of one Factor to depend on another. The second Factor will not increment until the first Factor exceeds its maximum value. This acts much like the odometer in a car. This checkbox is only used with Automatic Entry Types.
Range Check
When entering a numeric value you can check to make sure the value is in the appropriate range. This reduces the likelihood of an operator error during data entry. When you enable this option, the Range From and Range To become enabled and you enter the low and high values to check.
Range From
This is the lowest acceptable value you will allow the operator to enter for this Factor. If a value is entered lower than this setting, QC-CALC warns you that the value is out of range and displays the acceptable values.
Range To
This is the highest acceptable value you will allow the operator to enter for this Factor. If a value is entered larger than this setting, QC-CALC warns you that the value is out of range and displays the acceptable values.
Factor Setup – Text Factor
The Text Factors are similar to Numeric Factors but they can contain numbers and text. Text Factors cannot be incremented but you can build lists of names to be added to incoming inspected parts.
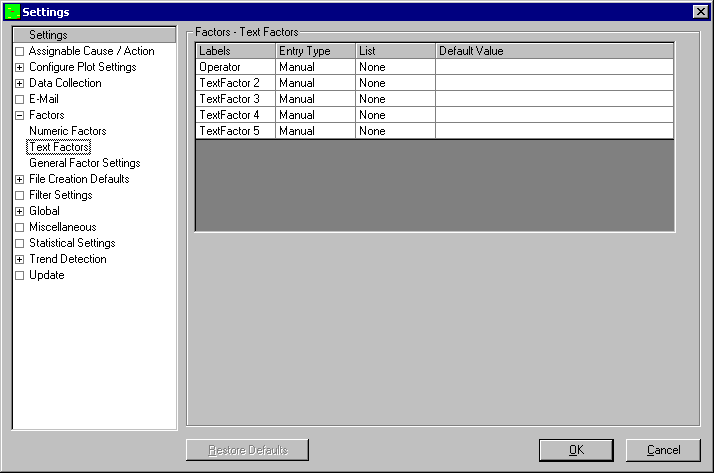
Labels
You enter a descriptive label from 1 to 32 characters describing the Text Factor. The label is entered by clicking in the area provided. Initially the label contains TextFactor 1 so type over it.
Entry Type
There are 4 different methods of setting up QC-CALC’s Text Factors:
None | This is the default setting and simply means no Text Factor information is added to your incoming inspection data. |
Manual | As the name implies, you manually enter the data in the Factor Values screen and the value is added to your inspection results as parts arrive. This process continues until you turn off the Factor or change the value. It is simple to use but the disadvantage is it is easily forgotten and may be adding old settings to new data. This entry method appears on the Real-Time Factor screen as an editable text-box that can be changed at any time. |
Required | When a Required method is used, QC-CALC automatically displays the Factor entry screen (if not already displayed) when a part arrives requiring a Factor value. |
Automatic | This method of entering Factor allows you to build a list of values to be used one after another as data is received from the CMM. This is the only entry method requiring that you to create or select a list of items; therefore, the List column is enabled when you select this method. This entry method appears on the Real-Time Factor screen but is NOT editable. |
List
Creating a List of Text Factor values is the same as creating Numeric Factors so please review the Numeric Factors Lists above. The Auto Fill Values button is not available in this screen.
Default Value
This is the starting value passed to QC-CALC and you may enter a value manually. This value continues to be used unless you change it in the Real-Time screen.