QUESTION
How do I save QCC files to different folders on my network?
SETTING THE QCC PATH
This is a bit of a complicated answer because it depends on which machine you are using. Most of our machine drivers allow you to tell us where to save the QCC file from within the part routine itself, but it depends very much on whether or not the machine supports the sending of non-measurement trace data (factors) to QC-CALC.
To get started, the path where QC-CALC Real-Time will save the data it collects is accessible via Tools > Options > Data Collection > Set Paths. At the top of the screen, there is a section called Location to Save New Data (QCC Files).
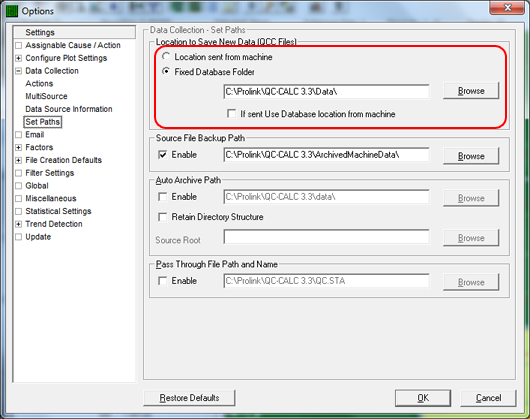
On this screen you have three options:
1. Location sent from machine - This requires the location to be sent from the machine.
2. Fixed Database Folder - This allows you to specify one folder where all QCC files will be saved.
3. Fixed Database Folder with override - If you check the box just below the fixed database folder (If sent use database location from machine), then you can optionally send the path in the output from the machine. If you choose not to send it for a particular QCC file, then QC-CALC will save it to the fixed database location.
The third option is generally recommended and gives you the most flexibility because it allows you to override the path only for those QCC files you want to redirect (for instance, if you have a specific customer folder where you want to store customer-related files).
NOTE: If you choose Fixed Database Folder but do not check the checkbox, QC-CALC will ignore all incoming path overrides and just use the fixed path.
Once you have set QC-CALC to allow an override from the CMM, you will need to specify the specific paths in your inspection routines. The following two topics cover setting this from the data source (inspection routine)
PASSING THE PATH FROM A SPEC PLAN IN QC-GAGE
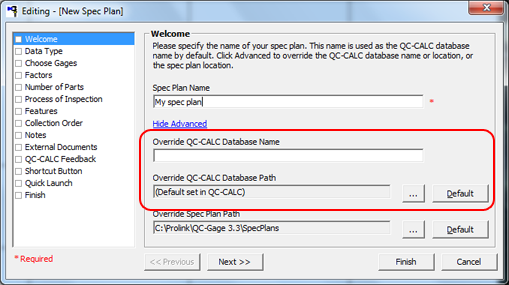
When you create your spec plan, the first screen of the Spec Plan Wizard allows you to override the output path in QC-CALC. To override it, simply select the Show Advanced link just below the spec plan name to show the advanced override fields. Then specify an override path in the second field. The first field allows you to override the name of the QCC file if you wish. Otherwise, it is named after the spec plan. Once specified, QC-Gage will send the override path to QC-CALC during data collection and QC-CALC Real-Time will obey the new path (assuming you have set the options above to allow overrides).
PASSING THE PATH FROM A CMM
This part is a little more tricky because it depends on which CMM you are using and the driver support for a PATHSWITCH variable. For most of our drivers, there is a section in the Machine Help called Passing Non-Measurement data to QC-CALC. Below is a picture of a section from the PC-DMIS machine help showing the PATHSWITCH option. Your best bet is to do a search for the word PATHSWITCH in all capital letters within your specific machine help section.
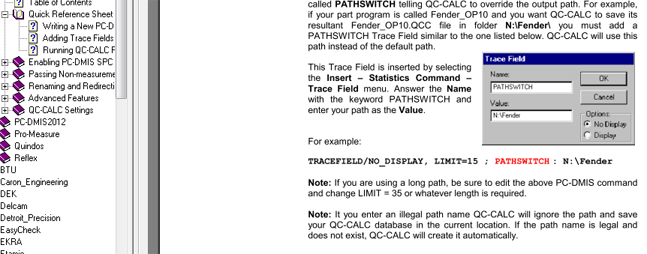
The PATHSWITCH variable allows you to add an override path. Its format is different depending on the driver, but the concept is generally the same. You specify a variable called PATHSWITCH (all capital letters) and the new path where you want to send the QCC file. QC-CALC is watching for this special command, and will automatically use it if found.
If you cannot find support for it in the Machine Specific help, please open a support ticket on Prolink's website and ask if we can add it to the driver. Prolink generally adds the PATHSWITCH option to all drivers that can support it, but it depends very much on the CMM's ability to output the special command.