Prerequisites
The PC connected to your inspection machine (CMM, Vision, gage station, etc) must be available on the network.
Introduction
This article describes how to set up QC-CALC Real-Time to run over a network (LAN).
QC-CALC Real-Time typically runs on a PC on the shop floor connected to an inspection machine. The databases created by QC-CALC are called QCC files due to their .qcc extension and are placed on the C drive of the PC by default when parts are measured.
Since the shop floor can be a dangerous place for a delicate PC, it is usually recommended that you store QCC files on a network for backup/recovery reasons. This way, data is collected on the shop floor, but is saved to a production file server on the network that is backed up nightly and can be recovered in the event of hardware failure.
In addition, if you place the data on the network, you make it available for other network applications such as QC-CALC SPC or the SPC Office Buddy.
Finally, QC-CALC Real-Time has an automatic recovery feature if the network goes down during data collection. When Real-Time detects a network outage, it immediately creates temporary files locally and begins saving the data from all measured parts there. Once the network is restored, Real-Time will automatically merge the temporary local data with the production files on the network. This all happens seamlessly so you don't have to worry about it or perform any extra steps.
Directions
- First, set up a shared location on a production file server with read/write access. The user account on the data collection PC will need to have read/write privileges. You may need to consult your IT department to determine the appropriate location and permissions for the folder.
Once this is ready, you'll get a path to this share (i.e. \\myprodserver\spcdata\).
- In QC-CALC Real-Time, pause data collection. This will prevent Real-Time from creating any new QCC files while you are migrating the existing files. This can be done by clicking the Pause "||" button on the toolbar in QC-CALC Real-Time.
- Now go to Tools > Options > Data Collection > Set Paths.
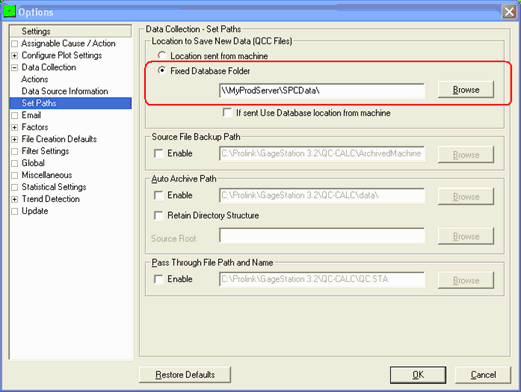
- Add the path to the shared server directory in the Fixed Database Folder area and click OK.
- Now open up the c:\Prolink\QC-CALC 3.x\Data directory in Windows Explorer and copy all the files found to your network share. Note: Starting with version 3.4 there are now hidden files associated with your .qcc files. We recommend copying the entire folder to the server location to make sure no files are missed in the copy operation.
- Once the files are copied, you may resume (un-pause) data collection in QC-CALC Real-Time by clicking the Pause button "||" on the toolbar.
Conclusion
Setting up QC-CALC to run on your network will allow you more flexibility and provide you with a central repository to organize all SPC related data from all CMMs and gaging stations.