Introduction
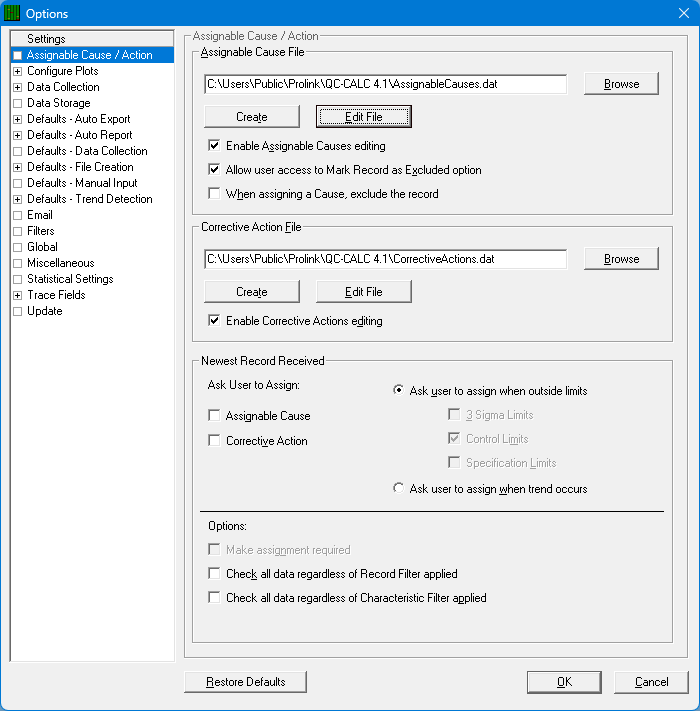
The QC-CALC database saves all the part data in one record. It also includes other data such as the time & date, Trace Field values, and Assignable Cause and Corrective Action references. These Assignable Causes are used to trace special events that occur to a measurement. The associated Corrective Actions explain what you did to fix the Cause of the problem. To create, select, or edit these causes and actions file, select Tools > Options > Assignable Cause / Action menu.
Similar to the Assignable Cause, the Corrective Action allows you to say what you did to fix a problem. The QC-CALC database reserves space for tagging each part with up to ten Corrective Actions. Use this option when a characteristic has been corrected with a known or identified Corrective Action. By assigning a Corrective Action to the part, you can track what was done to fix Assignable Causes.
Note: Much of the discussion in this section mentions Assignable Causes, and Corrective Actions operate in the exact same way.
You can add new Actions and modify old ones. The purpose of predefining Actions is to force consistent text when identifying corrections unless you choose to change the wording later. Once the Action is added, you can pick the Action from a list.
Set Assignable Cause File
Browse to File
QC-CALC uses two external text files to store your Assignable Cause and Corrective Action reference codes. These two files should be saved on a network server enabling all QC-CALC’s to display a standard list of Causes. You choose the Assignable Cause file by clicking the Browse button.
Create New File
You can create a new file on your server by pressing the Create button to see a file dialog box appear. Here you select the folder location and enter your file name. Again, consider using a common name and location (on the network) to ensure a consistent list of Causes for all inspectors pick from. AssignableCauses.dat is the default file, which is located in the QC-CALC install directory.
Editing Assignable Causes
These files are empty when you install QC-CALC. To edit the Assignable Causes, simply click the Edit File button and the existing codes are displayed allowing you to edit an old one or add a new one. You can begin adding and building your list of standard reference codes by clicking the Add New Entry button.
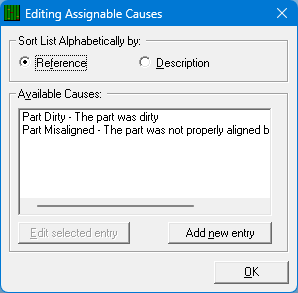
The reference name or number is limited to 16 characters; in most cases this is all that is required. However, you can add up to 256 characters in the description for each entry. Only the Reference text is displayed in QC-CALC Real-Time when reviewing the plot (main) screen.
Add & Edit Assignable Causes
When you click Add new entry or Edit selected entry, another window appears where you make your changes or add a completely new Cause.

Assign a Cause Automatically
You can have the new part data being received validated by QC-CALC to see if the operator needs to assign an Assignable Cause or Corrective Action to a measurement(s). This area of the Tools > Options > Assignable Cause / Action screen is used to set up that operation. When a value being received is either outside of the chosen limits or a trend occurred, you can have a window pop up and ask you to assign a Cause before continuing to collect data from your CMM.
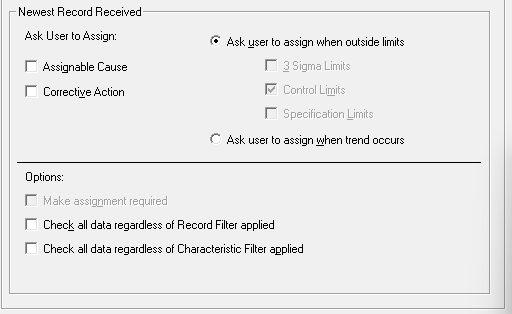
This option checks each new record that is received to see if it passes the criteria that you set. If the point is outside the 3 Sigma Limits, Control Limits, or Specification Limits you may require your operators to be prompted to set an assignable cause and/or a corrective action for that record. You can also have the same window appear if a trend occurs, and you can set the same limit validation within the Trend Analysis area if desired.
Make Assignment Required
Checking this option disables the Cancel button from the assignment screen. This means operators will not be able to leave the entry screen without having entered an Assignable Cause/Corrective Action.
Check all data regardless of Filter
Both of these options are used to ensure that the Assignable Cause/Corrective Action window is triggered even if a Record or Characteristic Filter is applied. When these options are not used, it is possible that values being received are not currently being viewed, so the Assignable Cause/Corrective Action window will not trigger.
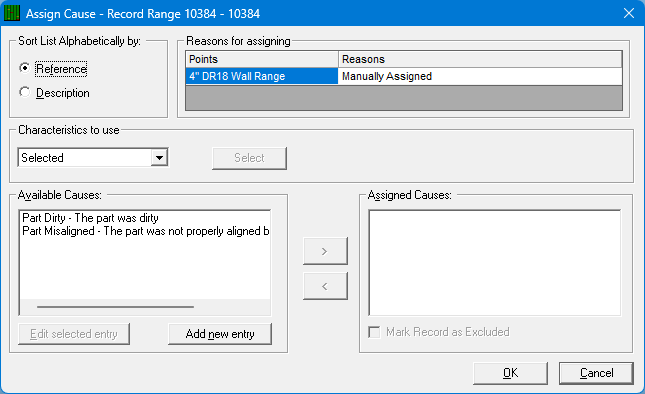
Assign a Cause Manually
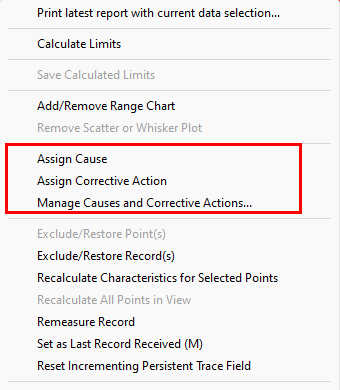
The QC-CALC database reserves space for tagging each measurement with multiple Assignable Causes. While viewing the Real-Time Plots, right-click the point of interest when a measurement has a known or identified problem and the Assign Cause screen will appear allowing you to pick a predefined Cause.
On the Assign Cause screen, select applicable characteristics from the Characteristics to use area and highlight the Cause from the Available Causes list. Now click the > button to add it to the Assigned Causes list, repeat this process if there are multiple causes to assign to the same measurement, and then click OK to save. Whenever the mouse floats over this point again, the tool-tip pops up the text describing the Cause.
Note: You can add new entries to the Available Causes list much like the discussion on the previous page. There is a button to Edit or Add New Cause entries.
If multiple users assign the same Cause or Action to a point, QC-CALC will recognize this and will not create duplicate entries, instead only keeping the first entry. However, you may still assign more than one unique Cause or Action to a point.
Tip: Causes and Actions were previously saved to the entire part file. As of QC-CALC version 4.0, single point values may now have Causes and Actions assigned to them individually. You can still assign Causes and Actions to multiple or all values in a record if necessary.
Sorting by Reference will sort the list alphabetically by the Assignable Cause name and sorting by Description will instead sort alphabetically by the first word in the description of the Cause. This can be helpful if you have a large list of Causes or Actions that you need to sort through. Reasons for assigning will be shown as Manually Assigned when entered by a user rather than automatically.
The Characteristic to Use list gives you the following options:
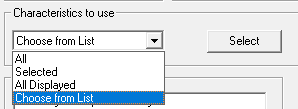
• All – Selects all characteristics within the chosen record.
• Selected – The measurement(s) clicked on originally will be chosen.
• Choose from list – This enables the Select button where you choose any characteristics within the same record.
Once you’ve finished your selections you will see your selected characteristics under the Reasons for Assigning list at the top of the Assign Cause screen.

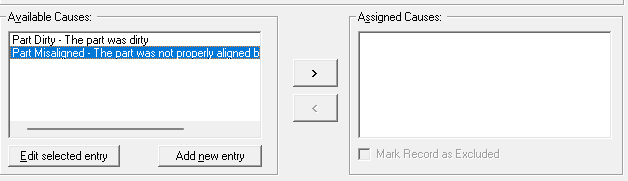
The Available Causes list shows all existing causes, but you may add entries to the list or edit existing options by using the buttons at the bottom. Choose a cause on the left then use the right arrow button move that cause to the Assigned Causes area.
Note: The option to Mark Record as Excluded may be enabled below the Assigned Causes list window if you have a point value that you wish to exclude from all calculations.
Manage Assignable Causes and Corrective Actions
You can manage Causes and Actions within a record by right-clicking on any point within that record and selecting the Manage Causes and Corrective Actions menu. The window displayed shows characteristics within the record and all causes and actions assigned to those characteristics.
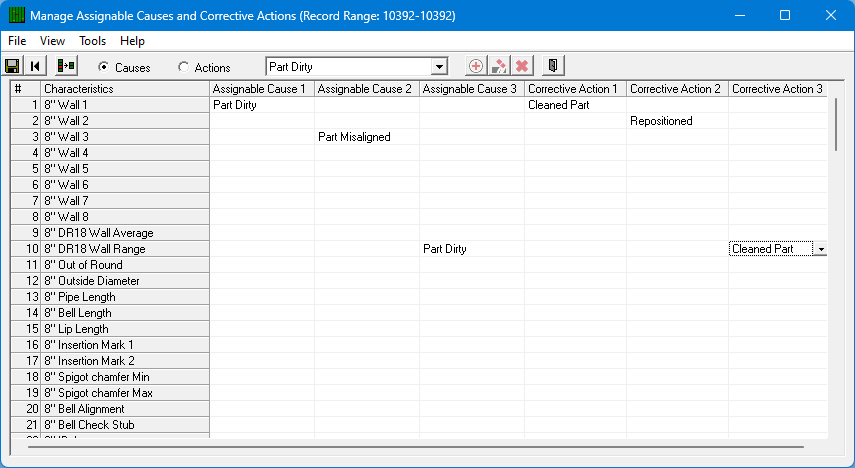
Clicking on any of the cells within this window brings up a list of causes or actions (based on the column you are clicking in) for you to assign.
If you need to apply the same Cause or Action to all visible characteristics within the record select the corresponding Causes or Actions option on the toolbar, choose the item you would like to assign to the measurements, then click the Add button to fill that value into the first available space for each characteristic.
Similarly, you can remove a Cause/Action regardless of where it appears for each characteristic by choosing that entry from the list at the top and clicking the Remove button.
Lastly, you can click the Remove All button to clear all Causes and Actions from the grid.
File
Use the File > Save menu or the button to save your changes as you make them, or you will be prompted to save upon exiting the Manage window. If you would like to leave without saving your changes use the File > Close menu and choose No when prompted to save or Cancel to remain in the Manage window.
View
You can choose which columns to view by checking the Assignable Causes or Corrective Actions menus. You can also choose which rows to view by using the Characteristics menu or the corresponding button.
Tools
The Tools > Move to first available space menu will process all assignable causes and corrective actions being shown and remove any spaces so that the first slot is used instead of possibly being empty with the second slot in instead. You can use the Manage Lists menu to edit the existing Assignable Cause and Corrective Action lists.