Symptom
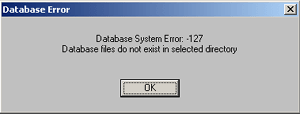
You have upgraded PC-DMIS to version 4.0 or higher and are now receiving an error message that says:
Database System Error: -127
Database files do not exist in selected directory.
Cause
QC-CALC has read and deleted the file from the original PC-DMIS output directory. The data is read correctly into QC-CALC, but the message is annoying.
Resolution
In earlier versions of QC-CALC, we recommended inserting a STATS ON command at the beginning of your part program. Since the release of PC-DMIS 4.0 we now recommend you insert a STATS ON command at the beginning of the part program but also include a STATS TRANSFER which is described in this section. If you have been using QC-CALC on earlier versions of PC-DMIS you must upgrade your part programs to include this new STATS TRANSFER command. Using the STATS TRANSFER yields the following advantages:
- Different versions of PC-DMIS are installed in different locations making it difficult to find the output file. Using this new method solves this problem.
- The ability to see data update live when a part repeat is active. Previously QC-CALC could not update its live screen until all parts on the stage were complete.
- Less interaction with DataPage updates means less warning messages.
Turn-On the Statistics Output File
Before results can be sent from your part program to the PC-DMIS results file, you must enable SPC output in your PC-DMIS part program. This two-step process consists of:
- Insert a STATS/ON command at the beginning of your part program.
- Insert a STATS/TRANSFER command at the end of your part program.
Step 1 – Insert a STATS/ON
PC-DMIS menus for Version:
3.0 - Utilities > Statistics
3.5+ - Insert > Statistics Command > Statistics
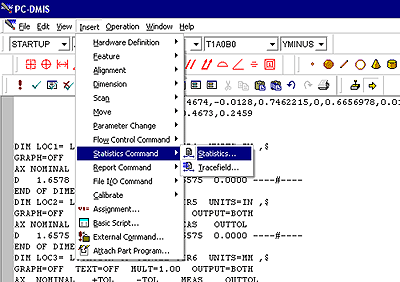
The Stats Options dialog box configures your inspection results so QC-CALC can correctly read the output file. Below is an example of the proper setup of the Stats Options.
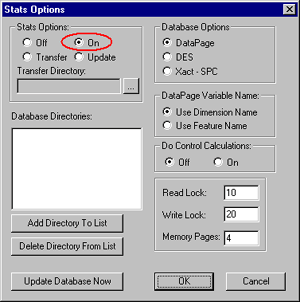
Stats Options - The default settings should be correct, but for reference:
- Update: not used with QC-CALC.
- Read Lock: not used.
- Write Lock: not used.
- Memory Pages: not used.
Step 2 – Insert a STATS/TRANSFER
To complete the output of inspection results, Insert > Statistics Command > Statistics, but this time, choose Transfer in the Stats Options. Insert this command at the end of your part program.
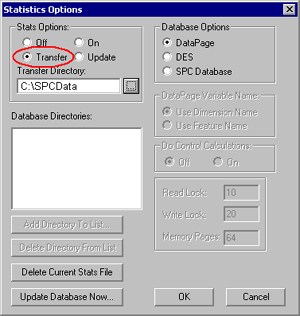
Since the release of PC-DMIS version 4.0, QC-CALC now uses a two-step process where you must insert a STATS/TRANSFER command at the end of your part program to instruct PC-DMIS to move the results file to a different folder. Here we chose:
C:\SPCData
QC-CALC automatically reads the information in this file, displays plots, and saves data. If the database exists, QC-CALC appends the new data. If the file does not exist, QC-CALC creates it.
Sample Listing
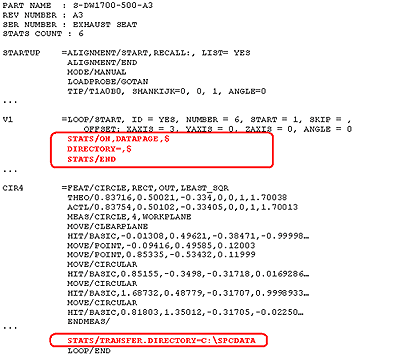
The result of these two STAT COMMANDS is circled in red in the partial listing of a sample part program below.
Setup Options - ALWAYS Save Stats to File
Each time a part program begins execution, PC-DMIS asks if you want to save Stats data. Press the F5 key to display the Dimension tab on the Setup Options screen. You can bypass this question by selecting the ALWAYS Save Stats to File check box.
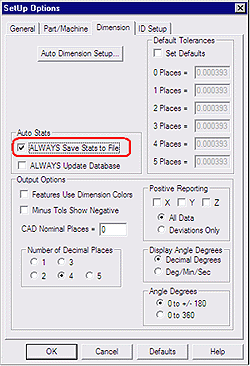
If this option is checked and a STATS/ON command exists in the part program, the statistical data is automatically saved to the output file. Make sure the ALWAYS Update Database option is unchecked to prevent other questions from popping up after every run.
Update DataPage Database
When you write a part program and run it for the first time, a popup asks if you want to update the DataPage Database. Check the Don’t ask me again checkbox and then the correct answer is NO.
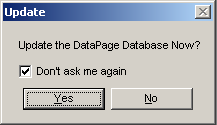
If you do not answer with a NO, you may receive the PC-DMIS error message at the top because QC-CALC has read and deleted the file.