Introduction
This article discusses creating a new record filter to filter the data viewed in QC-CALC Real-Time. This is not the same as a dimension filter which filters the number of plots viewed on the screen.
Steps
- In QC-CALC Real-Time, toggle the Filter window on by either clicking the Filter button (
 ) in the top toolbar or by clicking Window > Record Filter...
- In the Apply Record Filter(s) window on the left side, click the bar at the top that says Click Here to Select/Edit Filters.
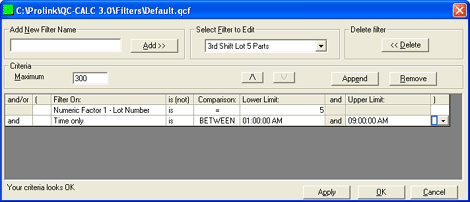
- In the popup window, type the name of your new filter in the Add New Filter Name box and click Add >>. For this example, we'll use "3rd Shift Lot 5 Parts" for the name. The name will be added to the "Select Filter to Edit" list and the criteria area at the bottom will reset.
The criteria is similar to a WHERE clause in Structured Query Language (SQL). It is basically saying "Show me all the records where the following criteria has been met. Exclude all other records."
Criteria can be any number of expressions combined with either AND or OR logic. Since the possibilities are virtually unlimited, we'll use an example and create the filter for that example. The example will be:
"Show me all records from lot number 5 that were inspected on third shift."
**The first assumption here is that your machine is sending Lot Number as the first numeric factor. The other assumption is that third shift runs from 1:00am-9:00am.
- First, create the criteria for Lot Number by choosing "Numeric Factor 1-Lot Number" in the Filter On: list. Leave the Is and Comparison operators as they are and type "5" in the Lower Limit box. This statement now essentially says "Numeric Factor 1-Lot Number is equal to 5".
- Now click Append to add another criteria statement to the grid. Leave the and/or value as "And" then choose "Time only" in the Filter On: list. Leave the Is operator alone and change the Comparison operator to "BETWEEN". Now type "1:00" in the Lower Limit box and "9:00" in the Upper Limit box. This statement now essentially says "Time of inspection is between 1:00am and 9:00am"
Together the two statements say "Lot Number is equal to 5 and Time of inspection is between 1:00am and 9:00am."

- Click OK to save your filter and close the window. The filter will now appear at the bottom of the list of filters on the left.
More Information
To apply the filter to the data in the plots, click the name of the filter in the list and the data will instantly be filtered. If there is no data to display, a message will appear in the plots area saying "No records passed the filter criteria."
To add multiple filters without leaving and re-entering the screen, you can alternatively click the Apply button. This button saves the current filter without leaving the screen.
Conclusion
This article was for creating new filters only. To edit an existing filter, perform steps 1 and 2. Instead of step 3, choose the filter to edit from the Select Filter to Edit list. Then perform steps 4-6. Click Apply or OK when finished.