GR&R Walkthrough
A walkthrough of the GR&R Wizard in QC-Gage
Print Friendly View
written: 01/03/2008
last modified: 04/10/2024

Introduction

QC-CALC offers a built-in Gage Repeatability and Reproducibility (GR&R) feature to assist you through the time-consuming task of conducting and reporting a study. It guides you through setting up, saving, and reusing many GR&R configurations. It steps you through conducting a GR&R study while predicting the outcome during the test. If the test results fail, you can shut down the study, fix the problem, and begin another study, saving you time and money.

Definition

A Gage Repeatability and Reproducibility Study (GR&R) is a method of determining the suitability of a gage or gauging system for

measuring a particular process. Every measurement taken has some error associated with it, and if this error is large compared to the allowable range of values (the tolerance band), the measuring device will frequently accept bad parts and reject good ones.

A Gage Repeatability and Reproducibility Study convey 6 basic pieces of information. They are:

        • Part Variation
        • Repeatability
        • Reproducibility
        • Repeatability and Reproducibility (R&R) Percent of Total Variation
        • Percent of Tolerance

GR&R study data is a not the same as SPC production data and therefore you do not want to mix gage study data with process data. Therefore, QC-CALC’s Real-Time screen acts differently during the collecting of GR&R data and many of QC-CALC’s features are disabled to reduce confusion.

When running a GR&R study one significant difference is the file naming QC-CALC uses. For example, if your part program is called MyPart10 and you inspect parts with it, QC-CALC saves your process data in a file called MyPart10.QCC. If you begin a GR&R study with this same part program QC-CALC creates a separate file called MyPart10_GRR.QCC. The data is stored in two separate files thereby preserving the integrity of your process inspection data and your GR&R data.

Steps to Conduct a Study

You can start a study at any time by following these basic steps:

        • Setup a study using the GR&R Wizard
        • Begin the study
        • Inspect parts

We will lead you through these steps and conclude with the final report.

Start the GR&R Wizard by choosing the Gage R&R – Begin New Study menu and the Welcome Screen of the Gage R&R Wizard is displayed. The list in the left panel is used to show where you are in the setup process. Here we show the Welcome Screen item by highlighting it in bold text. The right panel of the wizard changes as we move through the setup procedure. The buttons at the bottom of the panel navigate the wizard, begin the study, delete previously saved studies, or cancel from the wizard.

On this screen, you have two choices available in the list. You can either add a new study, or you can use one of the previously saved studies, which are listed alphabetically. If you choose a previously saved study, the Delete button becomes enabled allowing you to delete this study. The Begin Study button also appears at the far-left corner allowing for quick starts of known setups.

Study Parameters

There are three parameters for you to choose in each study; the number of Parts, the number of Trials for each operator to run, and the number of Operators measuring the parts. The current range for the number of parts in a study is 2 to 20 inclusive. The number of Trials and Operators is either 2 or 3.

Operator Information

You can enter real names for each operator. The purpose of these labels is to reduce operator confusion since they may forget which one of them is operator 2, and which one is operator 1. This would destroy the statistical value of the study. The name of the operator is displayed next to the Operator Number during the study.

Order Method

There are different methods that you can choose when deciding in what order to measure the parts of the study.

Run parts in random order

This is the most statistically accurate method of conducting a Gage R&R study. If you have 10 parts, 3 operators, and 3 trials in your study, there are 9 sets of parts. In each set, the operator and trial numbers are fixed and all 10 parts are measured in random order. The order of the sets themselves is also random.

Manually Set Order of Parts

If you have a specific order you wish to measure the parts you can type the numbers into the screen presented when you click the Next>> button. The wizard will check your entries to make sure you do not enter any illegal Part, Trial, Operator combinations or reuse any legal ones.

Choose Preset Order

The wizard can fill-in the GR&R test order for you by incrementing the part, trial, and operator.

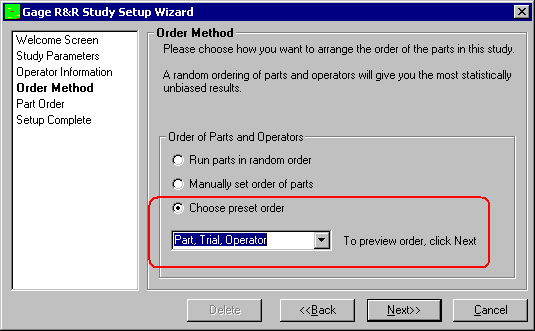
This time-saving features has 6 combinations of increments listed. They are:

Increment 3rd

Increment 2nd

Increment 1st

1

Part

Trial

Operator

2

Part

Operator

Trial

3

Trial

Operator

Part

4

Trial

Part

Operator

5

Operator

Part

Trial

6

Operator

Trial

Part

To understand how the list is generated, the increment sequence mimics the odometer in your car. The least significant word in the list (right side) is incremented first, then the next, and finally the 3rd. The generated sequence can be seen by choosing one of these six preset orders and clicking the Next>> button. If you pick an order you do not want, select the <<Back button and try again. Click the Next>> button to see the next order you chose.

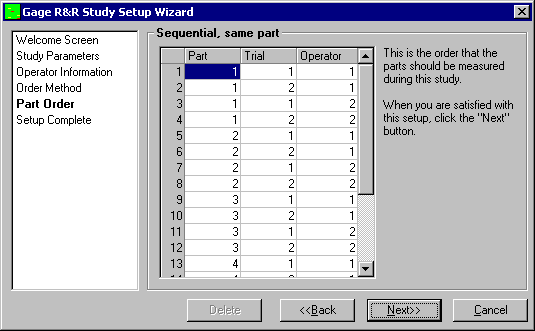
Part Order (automatic)

This screen displays the order the study is conducted. It gives you a chance to see the entire study laid out ahead of time. If you do not like the order you can click the <<Back button and create another random order for all of the parts.

Part Order (manual)

If you choose to specify the order of the parts manually, the Part Order screen is slightly different and the grid is editable. By default the grid is filled in similar to the Sequential with same operator choice but you may fill the grid any way you choose.

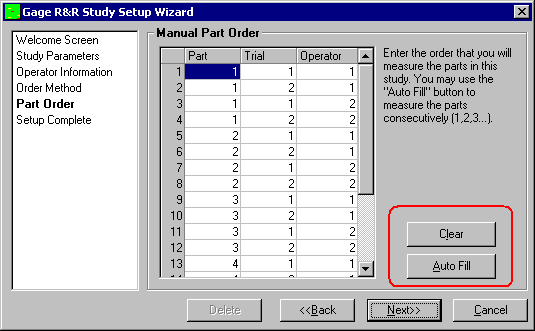
Also, there are two buttons that show up only with Manual Part Order. The Clear button clears the grid and fills it with zeros to show which areas have not been entered. The Auto Fill button fills the grid the same as Sequential Same Operator. This screen also checks for a correctly entered list of numbers to ensure the Gage R&R study is valid. This means that each operator must measure each part the appropriate number of times.

Setup Complete

This screen tells you the setup process is complete. The Next>> button has been replaced by a Begin button and when you click it, the wizard asks for the name of the study so this same setup can be used in the future.

If you are editing a previously saved study, then the name of the study is already placed in the name box by default. You can change the name to a completely different study.

Related Articles
Attachments

Applies To

QC-CALC Real-Time v.4.10
QC-CALC Real-Time v.4.00
QC-CALC Real-Time v.3.40