HOW TO: Setting up SQL Server Express
A guide on how to setup SQL Server Express for use with Prolink products
Print Friendly View
written: 08/10/2009
last modified: 04/15/2024

1. SQL Server Setup Guide

You must have a valid SQL Server database (MS SQL Express 2008 or higher, MS SQL Server 2012 or higher) in order to send data via EDL. If you do not have SQL Server installed, you will need to either purchase a full version from Microsoft or you can download the latest SQL Server Express for free from Microsoft’s website. This version has a couple of limitations, so it is not recommended for long-term use where a lot of data will be collected.

There is typically a link to download the latest version of SQL Server Express Edition for free from: https://www.microsoft.com/sqlserver

1.1 Enable Mixed Authentication Mode

During the SQL Server install process, you will be asked which Authentication Mode to use. We highly recommend using Mixed Mode (allows both SQL Server and Windows authentication).
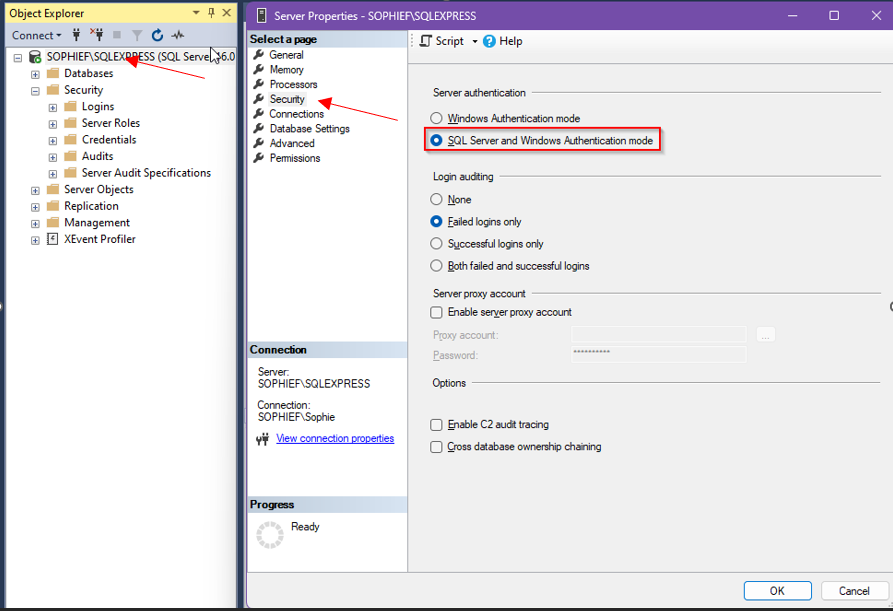
NOTE: The password for the SQL Server system administrator account entered on this screen will be needed later, so make sure to note the password you entered here.

1.2 Database Setup

If your database does not exist, it is fairly simple to create one. You can either do it yourself manually (see the Manual Database Setup section on page 4) or our software (EDL, ERS and QC-CALC Real-Time) can create the database for you (see the Automatic Database Setup section on page 3).

1.2.1 Automatic Database Setup

You can choose to create the database automatically directly through EDL, ERS or QC-CALC Real-Time.

1. In either application choose Help > Create Database. The following screen will appear.

2. Enter the server name and SQL instance (if necessary). If you are running SQL Express, this is “\SQLExpress” by default.

3. Enter the name you would like for your database. By default, we suggest “qc_calc”.

4. Enter “sa” as the System Administrator ID and the password you specified when installing SQL Server.

5. If you are getting this information from your IT department, please make sure you get an ID that has System Administrator privileges, as the ID will be used to create a database, add logins to the server, and add a user to the database.

NOTE (for IT Professionals): The SA user account is only needed for the initial database creation and will not be used going forward. When the script is run to create the database, it creates a separate user account called “qccadmin”. This account is given db_datareader, db_datawriter, and db_owner access to this database only. This ID will then be presented via a message box at the end of the script so the user can use this for reporting. The default password for the ‘qccadmin’ account is 'NimdaccQ12'.

NOTE (for IT Professionals): The db_owner role was added to allow the user to update the database when new versions of our software are available. This can be removed if there are security concerns.


6. Create Database Now vs. Get Script -

a. When ready, click Create Database Now. Upon successful creation, you will see a message box containing the user and password to use for reporting. Please take care to write this down for future use. You are now ready to run our software! You can skip section 2.4.

b. If there are errors creating the database, you may have to do it manually. If so, please read the next section.

c. You can alternately click Get Script Only to get the script that will be run. Please be aware that the script displayed is only for the tables of the database and does not include the actual CREATE DATABASE or other security related commands. This means a user account with db_datareader, db_datawriter, and db_owner access to this database will need to be created manually. The script in the window can be copied/pasted to SQL if needed. See the section below for the complete steps needed to create the database on your own.

1.2.2 Manual Database Setup

This section will help you create a database manually by adding the tables and user permissions. These steps will create the tables of your database and you will be ready to being using EDL and ERS once you have finished.

1. When SQL Server Management Studio Express opens, you will see the following screen. Click Connect to connect to the SQL Server using Windows Authentication for now.

2. Right click on Databases and select New Database.

3. Give your database a name. For this example, we will be calling our database qc_calc_2 since the standard qc_calc name was used during the Create Database operation. Click OK.

4. Now, expand Security on the left side of the screen.

5. Right click on Login`s and select New Login.

6. Create a Login name. For this example we’ll be using qccadmin

7. Make sure that SQL Server Authentication is selected and then create and confirm a Password. Make sure that Enforce password policy is unchecked. 8. Select the database you just created as your Default database, for this example it would be qc_calc_2. Click OK.

9. Expand Databases on the left hand side, and then expand your default database. Within that, expand Security.


10. Right click on Users and select New User.

11. On the General page, set your User Name and Login Name to match the one you just created.


12. On the Membership page, under Database Role check: db_datareader, db_datawriter, and db_owner. Click OK.

13. In the main Microsoft SQL Server Management Studio Express window, click New Query.

14. In EDL/ERS/QC-CALC Real-Time, choose the Help > Create Database menu then click the Get Script Only button.

15. Click in the area that appears at the bottom of the screen, click the CTRL+Home keys to go to the very top of that area, then click the CTRL+Shift+End keys to highlight the entire script. Right-click on the highlighted text, and choose Copy to get the script into the clipboard.

16. Next, go back to the Microsoft SQL Server Management Studio Express window and paste your clipboard into your new query window.

17. Make sure the database you created (qc_calc_2 in our example) is shown in the upper left of the screen and click Execute.

1.3 Enable Remote Access to SQL Server

To allow remote access to your SQL server:
1. Open SQL Server Configuration Manager
2. Expand the SQL Server Network Configuration section
3. Select Protocols for SQLEXPRESS (or MSSQLSERVER if you’re using the full version of MS SQL Server)
4. Right-click on TCP/IP and select Enable
5. Right-click on Named Pipes and select Disable

6. Right-click TCP/IP and choose Properties. Select the IP Addresses tab.

7. Scroll down to the very bottom. Enter “1433” for the TCP Port under the “IPAll“ section.

8. Restart the SQLEXPRESS service (or MSSQLSERVER service for the full version of SQL Server)
9. Confirm that the SQL Browser service is Enabled and Running (required for remote connections)

1.4 A Note on ERS Local Users

When you set up a new connection to a database in ERS for the first time, you’ll be asked to create a local user (“Local User ID” in the picture below). This is a local user for the ERS application specifically. It’s distinct from the user that connects to the database (“User ID” in the picture below). You also have the option of signing into ERS with your Windows Single-Sign On user.

Your local ERS user account keeps your work separate from other users in the system and prevents another user from inadvertently changing your reports or filters.

Please note, if you attempt to sign in with a local user account that already exists and has a different password you will be challenged for the correct password. The user account will not be added if there is an existing one with the same name.

You can change the local user signed into ERS at any time by going to File > Change Current Login.


2. Advanced SQL Server Format

2.1 Diagram

Below is an example of a diagram of the database format, but this is not up to date. An up to date diagram can always be found at: https://www.prolinksoftware.com/download/database/prolinkdatabase.html

2.2 General Description

The database format involves several tables and splits both the actual and meta data into smaller chunks for easier storage and processing. Since QC-CALC is very flexible and allows the part file database to seamlessly change over time, the database was designed to do the same.

Exact table definitions are below, but basically parts are stored in the qcc_file table at their highest level. The qcc_file table is synonymous with the part file itself and is meant to represent a particular type of part that is measured over time (i.e. a particular engine block). As things change with the part (i.e. tolerances change or another characteristic is added), the definition of the part is re-written to preserve the historical nature of the data. This new definition is defined as a qcc_file_model and is stored by effective date. For instance, the engine block we are measuring had 5 characteristics as of 1/1/2007 and has 6 characteristics as of 6/1/2007. These would be two different models both grouped under the same engine block in the qcc_file table. Each time anything about the part definition changes, a new model is added within the qcc_file_model table, and the definitions for characteristics and trace fields are redefined. All measurements are then linked to the new chars and trace fields of the new part type.

To explain further, a qcc_file_model is a snapshot of the definition of a particular part to be measured at a particular point in time. The model contains a unique set of characteristics and trace fields. When parts are actually measured, the part, measurement, and part_trace field tables are filled with actual data and are mapped back to their corresponding models, characteristics, and trace fields.

The assignable_cause and corrective_action tables define the entire list of assignable causes and corrective actions that can occur. The measurement_cause_map and measurement_action_map table allow specific causes and actions to literally be mapped to a measurement in a many-to-many fashion. Therefore, more than one part can use the same assignable cause and parts can have more than one assignable cause. In QC-CALC 3.x, assignable causes and corrective actions are mapped to the part and not the individual measurement. In QC-CALC 4.x, assignable causes and corrective actions will be mapped to the individual measurement. Therefore, the database is currently set up to store causes and actions at the measurement level, but actually stores them at the part level. This is temporary.


2.3 Table Definitions

qcc_file
This table represents the part file directly and groups all history of the part file under one umbrella. This allows for easier querying later across all parts of the same type. A combination of the part file name and the creation date on the file itself are used to positively identify part files from each other. This allows you to have similar part files from multiple plants sharing the same database. The EDL description (described above in the Options section) allows you to add a friendly name to describe the part file other than the file name itself. This way, if you have two part files with the same name from two different plants, you can tell the two apart in the database (i.e. widget (Shanghai) and widget (Los Angeles)).

qcc_file_id - This is the auto-generated primary key the defines the qcc file.
qcc_file_desc
- The name of the part file without the .qcc extension.
creation_date
- This is the creation date from the control section of the part file. It helps to uniquely identify one part file from another if there are multiple PCs with the same part files.
edl_desc
- This is a field identifying which copy of EDL actually added the data. This can be set at the plant level if desired.
archive_ind
– This is a tristate that indicates whether or not the part file has been archived. The values are 0 (normal), 1 (archived) and 2 (override normal). Override normal can be set in ERS to force a file to be visible throughout the application even if it has not had activity for a long period.
last_edit_date
– This is a date indicating the last time an edit occurred to the part file. It is an internal indicator for EDL.


qcc_file_model

This table represents a particular historical snapshot of the part as of a particular date. Each time a part is changed in the part file, a new part type record is generated along with the latest definition for the part. This allows us to maintain a historical record of the data as it looked on the particular day of the export. For example, in the part file, if the tolerances become smaller over time, parts that were previously in spec can become out of spec if measured against the new tolerances. Keeping this table and part type definitions historical keeps the history intact.

qcc_file_model_id - Auto-generated primary key
qcc_file_id_id
- Foreign key reference back to the qcc_file table. effective_date - The date as of which this new definition is effective.
sub_group
- Definition for the number of the subgroup for a particular model dimension

dimension
This table is a definition of all characteristics of a particular part type.

dim_id - Auto-generated primary key
qcc_file_model_id
- Foreign key reference back to the model table
dim_desc
- The characteristic label
dim_number - The number of the label in the Real-Time display
tol_plus
- The plus tolerance value (NULL if single sided lower type)
ctl_upper
- The upper control limit.
nominal
- The nominal
ctl_lower -
The lower control limit.
tol_minus -
The minus tolerance value (NULL if single sided upper type)
tol_type
- Defines the type of tolerance. Options are BI, SSU, SSL, NON for Bilateral, Single Sided Upper, Single Sided Lower, and Non-Toleranced respectively.

dim_type - defines the source of the data (from the machine, manually entered, or calculated)
dim_source_id -
Foreign key reference to the dim_source table that declares the source of the characteristic (i.e. which machine is literally responsible for the characteristic - currently only available via Zeiss Calypso)
extra_info - The characteristic information that accompanies characteristics from QC-CALC. This is set in the Edit Nominals & Tolerances screen of QC-CALC SPC 3.0.

balloon_number - This is the balloon number from the CAD drawing if supplied. transform_info – This field holds the settings for the Johnson Transform if one has been performed on the characteristic. This way, we can use the settings to perform the transform consistently going forward without having to recalculate the algorithm.
dim_source

This table holds a reusable list of characteristic sources. This allows you to track the source of a particular characteristic. For instance, it may be a particular machine on your shop floor that produced the characteristic. Since the same machine produces many characteristics, the same machine can be mapped to multiple characteristics in the characteristic table.
dim_source_id
– An auto-generated primary key.
dim_souce_desc
– The name of the source.

dim_relation_type
This table defines characteristic relation types so ERS knows how to handle the relationship in charts, reports, etc.

relation_type_id - Auto-generated primary key
relation_type_desc – The name of the relation type.


dim_relation

This table sets up a particular characteristic as the master characteristic of a particular characteristic relationship. The characteristic’s id is linked in this table and the child characteristics in the relationship are mapped through the dim_relation_map table.

dim_relation_id - Auto-generated primary key
dim_id
– The id of the characteristic that is the master in the relationship.
relation_type_i
d – A foreign key mapped telling us what type of relationship this is.


dim_relation_map

This table adds child characteristics to the relationship and identifies their roles in the relationship. For instance, in the case of True Positions, the True Position characteristic is the master characteristic in the relationship. This will be in the dim_relation table. The other 3 characteristics in the relationship (X, Y, and Diameter) would be mapped in this table.

relation_map_id - Auto-generated primary key
dim_relation_id
– A foreign key reference to the relationship definition including the master characteristic and relationship type.
map_dim_id – The id of the characteristic that is one of the children in the
relationship.
map_dim_desc
– The description of the role of the child characteristic (i.e. X, Y, DiameterPin, DiameterHole)
extra_info
– A characteristic information field for future expansion.

factor
This table houses the definitions of the trace fields for a given part type.

factor_id - Auto-generated primary key
qcc_file_model_id
- Foreign key reference back to the model table
factor_number
- The physical number of the trace field to keep them in order.
factor_de
sc - The description of the trace field.
factor_type
- The type of trace field (text vs. numeric)

part
This table represents an actual part measured in QC-CALC. It is the top level for the part and includes the measurement date, a sub group identifier, and the record number from the part file database.

part_id
- Auto-generated primary key
qcc_file_model_id
- Foreign key reference back to the model table
unique_record_number
- A unique record number from the part file. This is unique even if the part file database is circular.
record_number
- The current record number in the part file database. This number is not guaranteed unique if the file is set up to be circular. For a guaranteed unique number, use unique_record_number.
sub_group_id
- The auto-incrementing sub group number that allows part grouping at the subgroup level. This is a convenience field to allow aggregate rollups since the measurement data is stored at the lowest level rather than at the “point” level in QC-CALC.
measure_date
- The date and time the part was measured.
deleted_flag
- Indicates whether or not the entire part was excluded.
edl_load_date
– Indicates when the record was added to the database. Used for internal tracking purposes and the EDL export events.


measurement

This table houses the actual values that were measured. The values are stored based on the part and characteristic measured.

part_id - Foreign key reference back to the part
dim_id
- Foreign key reference back to the characteristic
value
- The actual value measured.
deleted_flag
- Indicates whether or not the point was excluded.
note_id
– Foreign key reference to a note for the measurement (notes are re-used).

note
This table houses all notes in a single place to avoid repeating the note in the measurement table. Therefore, if several points or entire subgroups of parts have the same note, the note will be added to this table once and then linked to all the appropriate measurements in the measurement table.

note_id – Primary key identifier
note_desc
– The notes themselves.

measurement_history
This table houses the historical values for CFR21 Part 11 auditing reasons. Whenever a field is changed, the latest value is updated in the measurement table. The audit trail of the edit is stored in this table.

part_id - Foreign key reference back to the part
dim_id
- Foreign key reference back to the characteristic
effective_date
- the effective date of the edit
field_changed
- the name of the field that changed.
old_value
- The value before the change
new_value
- The value after the change
user_id
- The user who made the change. Foreign key reference to user table.
reason_id
- The reason code for the change. Foreign key reference to reason table.
edl_load_date
– Indicates when the record was added to the database. Used for internal tracking purposes and the EDL export events.

part_history
This table houses the historical values for CFR21 Part 11 auditing reasons. Whenever a field is changed, the latest value is updated in the part table. The audit trail of the edit is stored in this table.

part_id - Foreign key reference back to the part
effective_date
- the effective date of the edit
field_changed
- the name of the field that changed.
old_value
- The value before the change
new_value
- The value after the change
user_id
- The user who made the change. Foreign key reference to user table.
reason_id
- The reason code for the change. Foreign key reference to reason table.
edl_load_date
– Indicates when the record was added to the database. Used for internal tracking purposes and the EDL export events.

user
This table houses the users of the system. Users are added to this table as they are used in QC-CALC - not when they are created.

user_id - Auto-generated primary key
user_desc
- The description of the user as passed from QC-CALC

reason
This table houses the reason codes in the system. Reason codes are added as they are used in QC-CALC - not when they are created.

reason_id - Auto-generated primary key
reason_desc - The description of the reason as passed from QC-CALC.


part_factor

This table houses the actual value of the trace fields of a particular part. The values are stored according to the part and trace field being measured.

part_id - Foreign key reference back to the part
factor_id - Foreign key reference back to the trace field
value
- The actual value of the trace field. This is stored as a 500 character field even though numeric values could also be stored here. For numeric values, convert the value to a numeric value. If the value is not set in QC-CALC, a NULL will be inserted.

assignable_cause
This table houses the complete list of assignable causes for all parts. This list is currently populated as the causes are used and not when they are literally created in the part file. This keeps the database more efficient.

cause_id - Auto-generated primary key
cause_ref - The short description or reference
cause_desc - The description of the cause. 500 character field.

corrective_action
This table houses the complete list of corrective actions for all parts. This list is currently populated as the actions are used and not when they are literally created in the part file. This keeps the database more efficient.

action_id - Auto-generated primary key
action_ref - The short description or reference
action_desc - The description of the action. 500 character field.


measurement_cause_map

This table allows the assignment of any number of assignable causes to a measurement. QC-CALC 3.0 saves assignable causes at the part level. This means that assignable causes will be mapped to each measurement in the part. In 4.0, assignable causes will be mapped at the measurement level.

part_id - Foreign key reference back to the measurement
dim_id
- Foreign key reference back to the measurement
cause_id
- Foreign key reference back to the assignable_cause
cause_number
- The number of the cause since there can be multiple. Also matches to the action.


measurement_action_map

This table allows the assignment of any number of corrective actions to a measurement. QC-CALC 3.0 saves corrective actions at the part level. This means that corrective actions will be mapped to each measurement in the part. In 4.0, assignable causes will be mapped at the measurement level.

part_id - Foreign key reference back to the measurement
dim_id
- Foreign key reference back to the measurement
action_id
- Foreign key reference back to the corrective_action
action_number
- The number of the action since there can be multiple. Also matches to the cause.


part_factor_history

This table holds historical trace field values for each part. As changes occur to the trace field values, a record of the change is automatically added to this table. If Part 11 mode is enabled in QC-CALC, the user_id and reason_id fields will be populated. Otherwise, these fields will be set to NULL.

part_id - Foreign key reference back to the part
factor_id -
Foreign key reference back to the trace field
field_changed
- The field that changed.
effective_date
- The effective date/time of the change.
old_value -
The value before the change.
new_value
- The value after the change.
user_id
- The user who made the change (Part 11 Mode only)
reason_id
- The reason the change was made (Part 11 Mode only)
edl_load_date
– Indicates when the record was added to the database. Used for internal tracking purposes and the EDL export events.

measurement_cause_history
This table holds the history changes to the measurement_cause_map table. As causes are added and removed, a record of the change is added to this table. This includes setting and removing assignable causes to/from the part and not just changes. In cases like this, the old or new value will be set to NULL.

part_id - Foreign key reference back to the part
dim_id
- Foreign key reference back to the characteristic
cause_number
- The number of the cause since there can be multiple.
effective_date
- The effective date/time of the change.
old_cause_id
- The cause_id before the change.
new_cause_id
- The cause_id after the change.
user_id
- The user who made the change (Part 11 Mode only)
reason_id
- The reason the change was made (Part 11 Mode only)
edl_load_date
– Indicates when the record was added to the database. Used for internal tracking purposes and the EDL export events.


measurement_action_history

This table holds the history changes to the measurement_action_map table. As actions are added and removed, a record of the change is added to this table. This includes setting and removing corrective actions to/from the part and not just changes. In cases like this, the old or new value will be set to NULL.

part_id - Foreign key reference back to the part
dim_id
- Foreign key reference back to the characteristic
action_number
- The number of the cause since there can be multiple.
effective_date
- The effective date/time of the change.
old_action_id
- The action_id before the change.
new_action_id
- The action_id after the change.
user_id
- The user who made the change (Part 11 Mode only)
reason_id
- The reason the change was made (Part 11 Mode only)
edl_load_date
– Indicates when the record was added to the database. Used for internal tracking purposes and the EDL export events.

constant
This table holds any constants that are needed in the system. Currently this includes the database version number.

constant – A label describing the constant.
value
– The value of the constant.

audit_history
This table holds any 21 CFR Part 11 actions that have occurred. These include the creation of new records, the signing of reports. They are not changes to individual parts so they are placed in a more generic table.

audit_id – An auto-generated primary key.
effective_date
– The date and time the action took place.
audit_desc
– The description of the action that took place.
user_id
– The user who performed the action.
reason_id
– The reason for the action.

audit_type
This table is related to the audit table (not audit_history) and tracks the type of activities that happen in the database. For instance, when EDL loads data an audit record is inserted to the audit table with an audit type of EDL Load.

audit_type_id - An auto-generated primary key.
audit_type_desc
– A description of the type.


audit

This table tracks activities that happen in the database. For instance, when EDL loads data an audit record is inserted to this table.

audit_id - An auto-generated primary key.
effective_date
– The date of the audit event
audit_type_id
– The type of event that occurred.
audit_desc
– The description of the event (records added, edited, etc)
user_id
– The user id performing the action.


2.4 Example Queries

These queries are meant as a guide for you to use to prove that the data is accurate. They are only samples.

2.4.1 Example 1: Retrieving Latest Part Definition For part File

Description:

This query gets the latest definition for a given part file.

Parameters:

Pass the name of the part file in the quotes at the end without the .qcc extension. In this example, “sample” is passed.

Query:

SELECT qf.qcc_file_id,

qf.qcc_file_desc,

qfm.qcc_file_model_id,

qfm.effective_date,

qfm.sub_group

FROM qcc_file qf

INNERJOIN qcc_file_model qfm

ON qf.qcc_file_id = qfm.qcc_file_id

WHERE qfm.effective_date =

(

SELECT MAX(qfm.effective_date)

FROM qcc_file_model qfm

INNERJOIN qcc_file qf2

ON qfm.qcc_file_id=qf2.qcc_file_id

WHERE qf2.qcc_file_desc=qf.qcc_file_desc

)

AND qf.qcc_file_desc ='sample'

Notes:

Leaving out the last “and” clause will get the latest part type for all groups.


2.4.2 Example 2: Retrieving Latest Part Characteristics For part File

Description:

This query gets the latest set of characteristics for a part file.

Parameters:

Pass the name of the part file in the quotes at the end without the .qcc extension. In this example, “sample” is passed.

Query:

d.ctl_lower,
d.tol_minus,
d.tol_type,
d.dim_type
FROM qcc_file qf
INNERJOIN qcc_file_model qfm
ON
qf.qcc_file_id = qfm.qcc_file_id INNERJOIN dimension d
ON qfm.qcc_file_model_id = d.qcc_file_model_id WHERE qfm.effective_date =
(
SELECTMAX(qfm.effective_date)
FROM qcc_file_model qfm
INNERJOIN qcc_file qf2
ON qfm.qcc_file_id = qf2.qcc_file_id WHERE qf2.qcc_file_desc=qf.qcc_file_desc )
AND qf.qcc_file_desc ='sample'
ORDERBY dim_number

Notes:

Leaving out the last “and” clause will get the latest characteristics for all groups.


2.4.3 Example 3: Retrieving Measured Values For Part

Description:

This query gets the measurements for part given the record number in QC-CALC

Parameters:

Pass the record number in QC-CALC as the last number. (i.e. 26)

Query:

SELECT p.part_id,
p.record_number,
d.dim_id,
d.dim_desc,
d.dim_number,
d.tol_plus,
d.ctl_upper,
d.nominal,
d.ctl_lower,
d.tol_minus,
d.tol_type,
d.dim_type,
m.value
FROM qcc_file_model qfm
INNERJOIN part p
ON qfm.qcc_file_model_id = p.qcc_file_model_id INNERJOIN dimension d
ON qfm.qcc_file_model_id = d.qcc_file_model_id INNERJOIN measurement m
ON
p.part_id = m.part_id AND d.dim_id = m.dim_id
WHERE p.record_number = 26

Notes:

If you add an INNER JOIN to the qcc_file table to the FROM clause: INNER JOIN qcc_file qf
ON qf.qcc_file_id = qfm.qcc_file_id

And add the following section to the WHERE clause:
AND qfm.effective_date =
(
SELECT MAX(qfm.effective_date)

You will get the measurements for the sample.qcc file for record number 26.

2.4.4 Example 4: Retrieving Measured Values Using Subgroup Average

Description:

This query gets the measurements for a set of parts and averages them by sub group for a particular characteristic.

Parameters:

Pass the qcc file name (widget) and the characteristic description (x hole position).

Query:

SELECT ROUND(AVG(m.value), 4)
FROM qcc_file_model qfm
INNERJOIN qcc_file qf
ON qf.qcc_file_id = qfm.qcc_file_id
INNERJOIN part p
ON qfm.qcc_file_model_id = p.qcc_file_model_id

INNERJOIN dimension d
ON qfm.qcc_file_model_id = d.qcc_file_model_id

INNERJOIN measurement m
ON p.part_id = m.part_id
AND d.dim_id = m.dim_id
WHERE qf.qcc_file_desc ='widget'
AND d.dim_desc ='x hole position'
AND qfm.effective_date =
(
SELECT MAX(qfm2.effective_date)
FROM qcc_file_model qfm2
INNERJOIN qcc_file qf2
ON qfm2.qcc_file_id = qf2.qcc_file_id
WHERE qf2.qcc_file_desc = qf.qcc_file_desc )
GROUPBY p.sub_group_id

2.4.5 Example 5: Retrieving Measured Values Across Models

Description:

This query retrieves measurements over time of a given characteristic and qcc file regardless of the qcc_file_model. In other words, if the structure of the part changes (i.e. tolerance changes or an additional characteristic is added) over time, you can still retrieve values across the qcc_file_models using LEFT JOINs.

Parameters:

Pass the name of the part and the characteristic label.

Query:

SELECT qf.qcc_file_desc,
p.measure_date,
p.record_number,
d.dim_desc,
m.value
FROM qcc_file qf
LEFT JOIN qcc_file_model qfm
ON qf.qcc_file_id = qfm.qcc_file_id
LEFT JOIN dimension d
ON qfm.qcc_file_model_id = d.qcc_file_model_id
LEFT JOIN part p
ON qfm.qcc_file_model_id = p.qcc_file_model_id
LEFT JOIN measurement m
ON p.part_id = m.part_id
AND d.dim_id = m.dim_id
WHERE qf.qcc_file_desc = 'widget1'
AND d.dim_desc = 'Feature 6'

Notes:

Make sure to use LEFT JOIN rather than INNER JOIN or the non-matching records will be excluded.

2.4.6 Example 6: Retrieving Out Of Control Values

Description:

This query retrieves measurements that are outside of control limits. This could easily be changed to look at spec limits as well.

Parameters:

No params for this query.

Query:

SELECT p.record_number,
d.dim_desc,
d.ctl_upper,
d.ctl_lower,
m.value
FROM qcc_file qf
INNERJOIN qcc_file_model qfm
ON qf.qcc_file_id = qfm.qcc_file_id
INNERJOIN part p
ON qfm.qcc_file_model_id = p.qcc_file_model_id INNERJOIN dimension d
ON
qfm.qcc_file_model_id = d.qcc_file_model_id INNERJOIN measurement m
ON p.part_id = m.part_id
AND d.dim_id = m.dim_id
WHERE m.value NOTBETWEEN d.ctl_lower AND d.ctl_upper

Notes:

This could be narrowed to include only those parts from a particular qcc_file_model or qcc_file by adding additional WHERE statements.

Applies To

Enterprise Data Loader v.4.20
Enterprise Data Loader v.4.00
Enterprise Report Scheduler v.4.20
Enterprise Report Scheduler v.3.40
QC-CALC Real-Time v.4.10
QC-CALC Real-Time v.4.00

Category

Installation
See more articles in this category