Introduction
By default, QC-CALC Real-Time displays all features in the order they were sent from the CMM or gage. However, customers sometimes want to change the order of these plots according to their preference.
WARNING: This should only be done if you use "Always Adapt" mode in the Actions of QC-CALC Real-Time. Always Adapt uses Dimension Label matching during data collection to determine where to insert the new measurements. All other modes except "Always Adapt" use ordinal position.
If you change the Dimension order and collect data without "Always Adapt" mode, new values will end up under the wrong dimensions. Please go to Tools > Options > Data Collection > Actions to ensure this is set. At the top of the screen, choose "Always Adapt" from the list that says If number of machine dimensions in part does not match those in file... and click OK.
Directions
- In QC-CALC Real-Time, go to File > Modify Database Structure and navigate to the Database Properties tab.
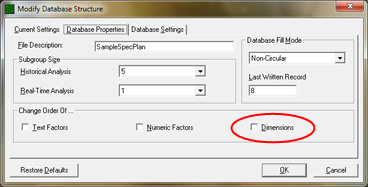
- Check the Dimensions checkbox and click OK. The Dimensions window will appear, with all Dimensions listed on the left.
NOTE: You can also re-order Text or Numeric Factors this way.
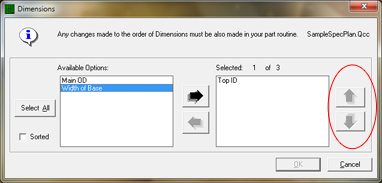
- Move the dimensions across to the right in the order you want to use. To change the order in the list on the right, you can also choose dimensions and click the Up/Down arrows to move them within the list.
- When finished, click OK. To cancel at any time, click Cancel