The Manual Input screen (MIS) gives you an interface to enter extra data into a file that already contains the data from the inspection machine. Normally an inspection machine automatically measures a part and sends the data over to QC-CALC to be analyzed and displayed. For this process everything is done automatically.
Now, what if, in addition to automatic part checks, you have to check parts with a different machine or by hand (Ex. microscope) where no automatic output feature exits? The Manual Input screen gives you the ability to enter these values into the same file as the inspection machine data. This needs to be set up so it launches at the right time and for the right number of parts.
Setup Manual Input
To set up the Manual Input screen, choose Tools – Set up Manual Input and the setup screen will launch. There are two sections to this screen; Settings and Input Values.
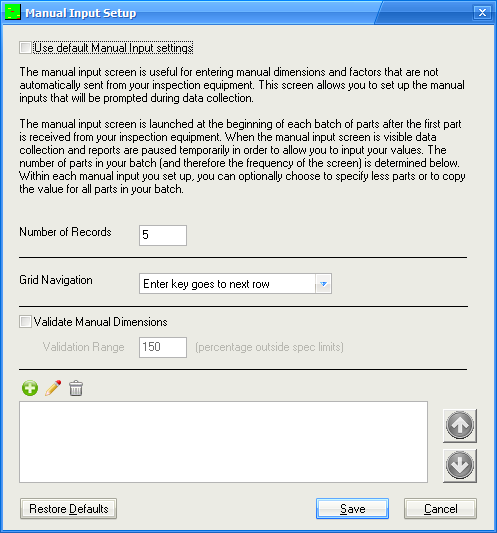
At the top of the screen, a checkbox labeled Use default Manual Input settings allows you to either use the defaults set in the Tools – Options area or override the settings for this specific QCC file.
First, set the Number of Records option to tell QC-CALC how often to launch this screen. In the picture above, this has been set to 5. This means the screen will launch every 5 parts to ask for manual values to be entered. It is important to understand that it will launch at the beginning of each group of 5 parts. When the data is entered, the values will then be applied to the next 5 parts as they arrive. If you shut down QC-CALC or change QCC files by inspecting different parts, it will not remember the manual values entered so it is important to enter the data and measure the parts together before switching parts.
The Grid Navigation choice controls how the screen behaves when asking for values.
The Validate Manual Dimensions option instructs QC-CALC to validate the dimensions being entered. This is set as a percent of tolerance. Therefore, if you set it at 150%, then it will warn you if a number that is typed is outside 150% on either side of tolerance. This is meant to prevent wildly out of tolerance values such as a misplaced decimal point (typing 11 instead of 1.1).
Adding/Editing Manual Inputs
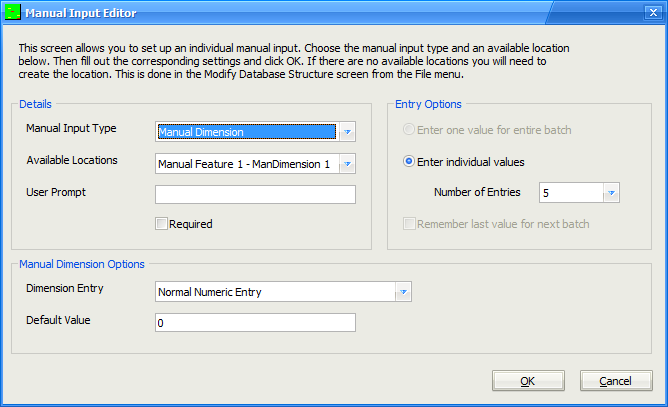
The bottom section of the screen is where you set up the actual data points (dimensions and factors) that will be manually entered. To add entries, click the green plus icon and the Manual Input Editor screen will be displayed.
Details
Manual Input Type
This screen allows you to enter either Manual Dimensions or Factors (Numeric or Text). Some of the remaining settings on this screen will change depending on the choice made here.
Available Locations
This is the location where the entered data will be placed. It can either be a Factor or a Manual Dimension.
User Prompt
This is the message the user will see. Enter something friendly like “Please type the serial number of the part” or “Please bar code scan your badge” to lead the operator through the process.
Required
With this option checked the operator will not be able to close the Manual Input Screen unless this value has been entered.
Entry Options
Enter one value for entire batch
This choice is only available for Factors. With this option chosen the value entered into the Manual Input Screen will be used for all records in the session. This is useful for things like “Operator Name” and “Lot Number” where the same value applies to everything in this session.
Enter individual values
This is available for both Factors and Manual Dimensions. When this option is chosen you will need to enter the Number of Entries (records) that will be required on the Manual Input Screen. This number may be less than the total Number of Records entered into the Manual Input Setup screen.
For instance, you may want to launch the screen every 5 parts, but only want to manually measure the first 3 of those parts for a particular Manual Dimension. In this case, the Number of Records on the main Manual Input Setup screen would be 5 and the Number of Entries for this Manual Dimension would be 3. If you want to have the operator fill in data for all parts in the session, make sure the Number of Entries number matches the Number of Records.
The entries are always at the beginning of the sample set. Therefore, if the frequency is 5 and a dimension has the Entries set as 3, it is always the first three parts that will have a value for the dimension and the remaining 2 will not be used (a Null value for Text Factors, 0 for Numeric Factors, or set to Nominal and Marked as Deleted for Manual Dimensions).
Note: Each different type of data entry point can have its own value for Entries. This allows you to set up some of your factors for all parts, but other dimensions for only some of your parts.
Remember last value for next batch
This choice is only available for Factors. With this option chosen the value entered into the Manual Input Screen during the last session will automatically populate the Manual Input Screen during the next session. This value can be changed if necessary, but it many cases it is a good starting point.
Manual Dimension Options
Dimension Entry
There are 3 choices for this option:
- Normal Numeric Entry – With this option the operator would just type in the number for this dimension.
- Enter as Pass or Fail – With this option the operator would be given a choice of “Pass” or “Fail” only.
- Enter as Pass or Fail with N/A option – With this option the operator would be given a choice of “Pass” or “Fail” or “N/A”.
Default Value
This is simply the default value of the dimension. When the screen launches, cells with default values are pre-populated allowing the operator to enter the data only if it changes.
Factor Options
Choose from list
This option allows you to force the operator to choose the value from a list. This is useful for repeating values such as operator names or machine numbers where there is a finite list of items from which to choose. It helps to provide consistency in your data making filtering easier later.
Note: It is always recommended that you use lists when possible, especially for typed values such as names. Often operators will spell their names differently depending on mood or time of day (initials, first name, etc). By forcing a list, it ensures the data will be entered the same every time.
Default Value
This is simply the default value of the factor. When the screen launches, cells with default values are pre-populated allowing the operator to enter the data only if it changes.
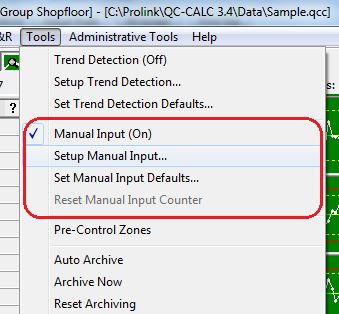
Turning Manual Input On/Off
The Manual Input functionality is turned on and off via the Tools – Manual Input menu. Simply click it in the Tools menu to activate or deactivate the MIS.
Entering Data via Manual Dimension Values Screen
To add data into this Manual dimension, select Manual Dimension Values from the View menu and a spreadsheet “like” grid is displayed. The grid contains the same number of values as displayed points. As you type the number into the grid, you will see the plot updating. Should you make a mistake, move up in the grid and change your entry.
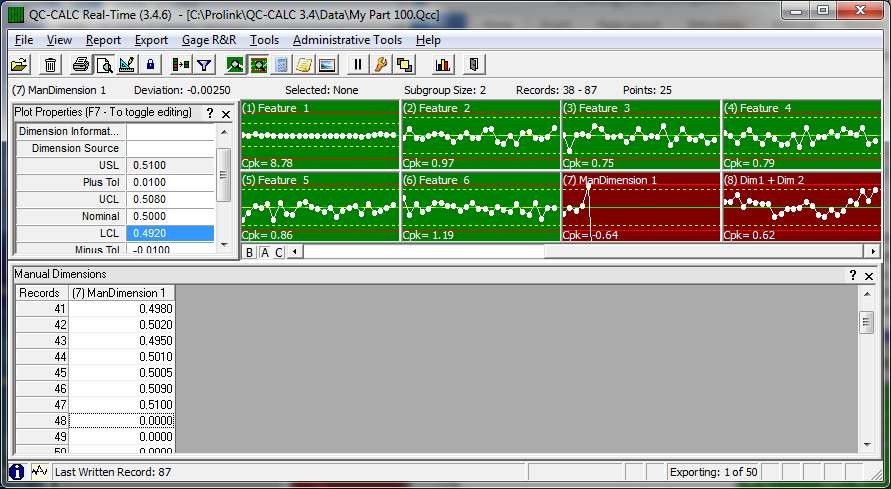
Remember, QC-CALC stores the manually entered results in the database so you can treat the manual dimension the same as any other dimension.