PREREQUISITES
QC-CALC Real-Time 3.4 and an account on Net-Inspect's website.
INTRODUCTION
QC-CALC has the ability to export directly to Net-Inspect's website without any need for you to upload files. It seamlessly connects to their website via a web service and uploads the data you specify using your user credentials. If the part file doesn't exist on the NI website at the time of export, it will be automatically created on their side.
The steps below are for the manual export, but the automatic export works identically (other than setting the frequency of the export). Many of our customers actually set it to upload each part as it is received from the CMM allowing you use QC-CALC as an intermediary between the CMM and Net-Inspect.
WARNING
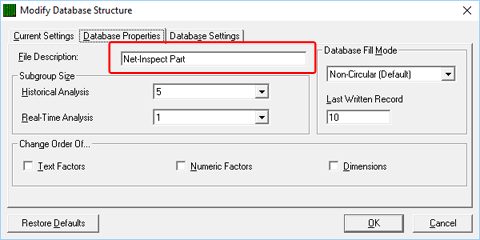
When exporting to Net-Inspect, please be advised that the part name used in NI is taken from the File Description in QC-CALC and not the QCC file name itself. Therefore, the name of your QCC file could be widget.qcc, but it will show up in Net-Inspect as "Net-Inspect Part" in the example below. This actually adds a bit of flexibility but can be confusing the first time. . In QC-CALC Real-Time, this field can be edited in File > Modify Database Structure > Database Properties.
STEPS
- In QC-CALC Real-Time, select Export > Export Data.
- From the Manual Export Settings screen, choose Net-Inspect Web Export as the export type.
IMPORTANT: Do not choose the regular Net-Inspect export type as this only creates a file. This is an older export type and is being left in there for backward compatibility.
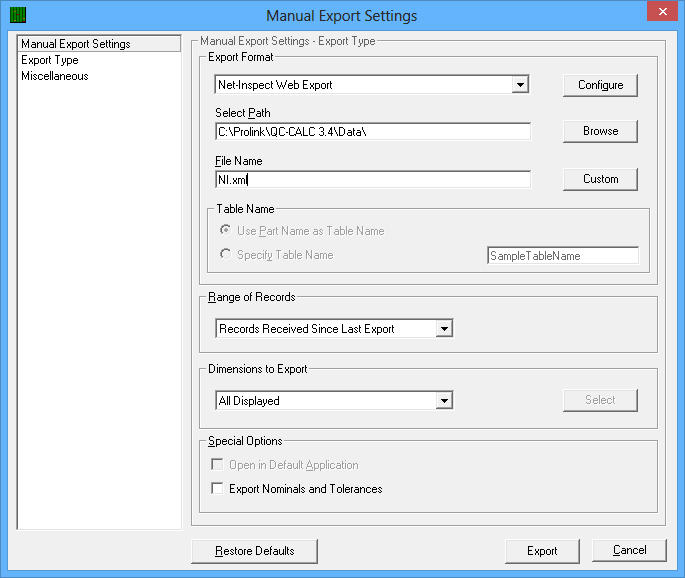
- QC-CALC will ask for an export path. Choose any path where you have read/write access. The actual path is not important because the file is only created temporarily and is deleted once the upload to Net-Inspect is completed.
- Click the Configure button.
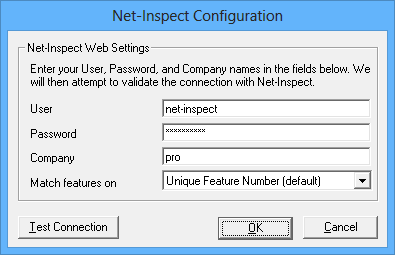
- On the Configuration screen, type the same user, password, and company credentials that you typically use to log in.
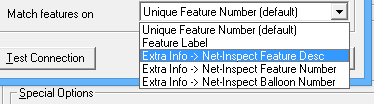
- At the bottom of the screen, choose the field on which to match your dimensions. If you are unsure of this field, leave it set to Unique Feature Number. (see below for details)
- Click OK. (You should receive a message indicating that the user credentials have been validated.)
- Choose the number of records and dimensions to export and click Export.
- Your export should occur and the file will be uploaded. Data should be viewable on Net-Inspect's website immediately.
MORE INFORMATION
On the configuration screen, the match features field allows you to match the features you're uploading to those of an existing file already in Net-Inspect. For instance, some customers balloon their print in a product such as Discus and upload this balloon information to Net-Inspect. They then want to make sure that the measured feature data actually matches up to the correct fields from Discus given that CMMs are typically not programmed to measure in the same order as the balloon numbers.
To do this, use the Extra Info (Dimension Info) field in QC-CALC to set unique identifiers that can be matched in Net-Inspect. You can match them to feature description, feature number or balloon number in Net-Inspect. The setting of the extra info field is done via File > Edit Nominals and Tolerances in QC-CALC Real-Time. The Dimension Info (synonymous with Extra Info) field is a free form text field that is saved at the dimension level (meaning you only have to set it once per dimension and not for each part like factors). In the Extra Info field, type the identifier for each feature where you want to match it to a corresponding feature in NI. For instance, let's say you want to match it to balloon numbers in Net-Inspect. In File > Edit Nominals and Tolerances, choose the dimension on the left side and type the balloon number into the Dimension Info field on the right side. Continue doing this for all your balloon numbers by selecting the appropriate dimension and typing each balloon number into the Dimension Info field. Click OK when finished to save your results.
When ready to export to Net-Inspect, choose Match Features on... Extra Info -> Net-Inspect Balloon Number. When the file is sent to Net-Inspect, it will contain all the information as well as a command to NI to match the dimensions by balloon. NI will automatically place the data in the right spot.
DISCLAIMER
At the current time, deleted points/parts in QC-CALC are not recognized by Net-Inspect and will be shown as regular parts.