Introduction
In addition to the characteristics coming from your part program (known as Machine Characteristics), you can add characteristics requiring keyboard entry, known as Manual Characteristics. Most times, these values are collected using a hand-held gage or another source, and they will need to be stored with the CMM data to complete the part run. Examples of these measurements may include hardness value, chemical reading, or color value.
QC-CALC can also include characteristics that are calculated as described in the help file. This means QC-CALC has a total of 3 different measurement types plotted in Real-Time.
Machine Characteristics | Received from your CMM part program |
Calculated Characteristics | Extra characteristics calculated by QC-CALC |
Manual Characteristic | Extra characteristic entered via keyboard |
Adding a Manual Characteristic gives you the unique capability to add separate characteristics in your existing QC-CALC part file that cannot be measured on your CMM. There are a couple of ways to add manual characteristics while inspecting your parts, but only the Manual Input screen will be discussed here.
The Manual Input screen gives you an interface to enter extra data into a part file that already contains the data from the CMM machine. This screen allows you to enter additional values into the same file as the CMM data. This needs to be set up so it launches at the right time and for the right number of records.
Setup Manual Input
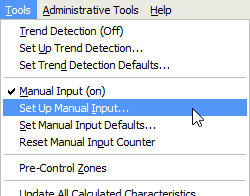
If just setting up a manual characteristic for one specific part, we’ll want to use the Tools > Set Up Manual Input menu. There are two sections to this screen: Settings and Input Values.
At the top of the screen, a checkbox labeled Use default Manual Input settings allows you to either use the defaults set in the Tools > Set Manual Input Defaults area or override the settings for this specific part file. You can set up the Manual Input defaults for all parts using the Defaults screen. This screen will display the same options but will automatically be applied to all new part files. For this section, however, we will focus on setting up Manual Input for a single part file, so Uncheck the Use default Manual Input settings option.
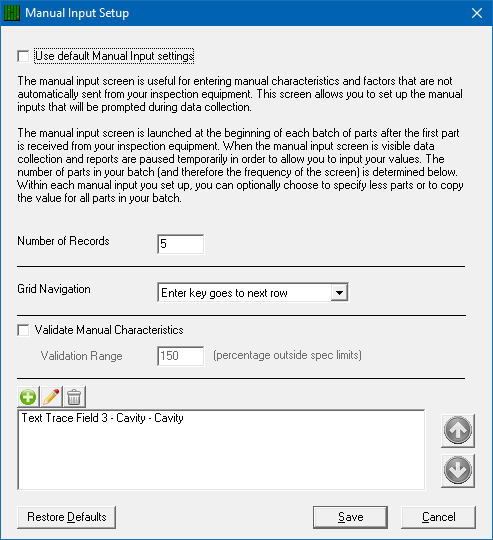
First, set the Number of Records option to tell QC-CALC how often to launch this screen. In the picture above, this has been set to 5. This means the screen will launch every 5 parts to ask for manual values to be entered. It is important to understand that it will launch at the beginning of each group of 5 parts. When the data is entered, the values will then be applied to the next 5 parts as they arrive.
NOTE: Shutting down QC-CALC or changing part files by inspecting different parts will cause the software to forget the manual values entered. It is critical to enter the data and measure the parts together before switching parts.
The Grid Navigation choice controls how the screen behaves when asking for values. When pressing Enter after entering values for your manual characteristics, the focus will either go down (“next row”) or to the right (“next column”).
The Validate Manual Characteristics option instructs QC-CALC to validate the characteristics being entered. This is set as a percent of tolerance; therefore, if you set it at 150%, then it will warn you if a number that is typed is outside 150% on either side of tolerance. This is meant to prevent wildly out of tolerance values such as a misplaced decimal point (typing 11 instead of 1.1). With manual characteristics there is more opportunity for human error via keyboard entry; using this option will help prevent errors of this nature.
Manual Input Editor
The bottom section of the screen is where you set up the actual data items (characteristics and trace fields) that will be manually entered. To add entries, click the green plus icon, and the Manual Input Editor screen will appear.
Details
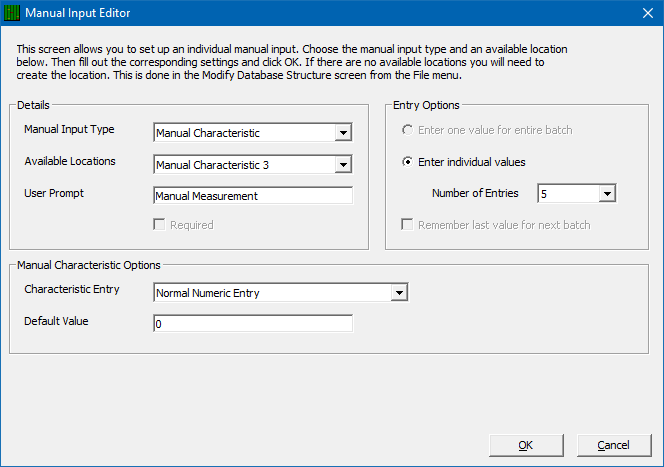
Manual Input Type - This option allows you to choose either Manual Characteristics or Trace Fields (Numeric or Text) as the type of data to be entered. Some of the remaining settings on this screen will change depending on the choice made here.
Available Locations - This is the location where the entered data will be placed. It can either be a Trace Field or a Manual Characteristic. Be sure not to use a location for data that may already be automatically received by another source by adding additional characteristics and trace fields in the File > Modify Database Structure > Database Settings menu.
User Prompt - This is the message the operator will see when the Number of Records to prompt the Manual Input is fulfilled. Enter instructions such as “Please type the serial number of the part” or “Please bar code scan your badge” to lead the operator through the process.
Required - With this option checked, the operator will not be able to close the Manual Input Screen unless this value has been entered.
Entry Options
Enter one value for entire batch - This choice is only available when Text or Numeric Trace Fields is set as the Manual Input Type. With this option chosen, the value entered into the Manual Input Screen will be used for all records in the session, or the Number of Records set on the previous screen. This is useful for things like “Operator Name” and “Lot Number” where the same value applies to everything in this session.
Enter individual values - This is available for both Trace Fields and Manual Characteristics. When this option is chosen, you will need to set the Number of Entries (records) that will be required on the Manual Input Screen. This number may be less than the total Number of Records entered into the previous screen.
For example, you may want to launch the screen every 5 parts but only want to manually measure the first 3 parts for a particular Manual Characteristic. In this case, the Number of Records on the main Manual Input Setup screen would be "5" and the Number of Entries for this Manual Characteristic would be "3." If you want the operator to fill in data for all parts in the session, make sure the Number of Entries number matches the Number of Records.
The entries are always at the beginning of the sample set. Therefore, if the Number of Records is 5 and a characteristic has the Entries set as 3, the first three parts always have a value for the characteristic, and the remaining 2 will not be used (a Null value for Text Trace Fields, 0 for Numeric Trace Fields, or set to Nominal and Marked as Excluded in the plots for Manual Characteristics).
NOTE: Each different type of data entry point can have its own value for Entries. This allows you to set up some of your trace fields for all parts, but other characteristics for only some of your parts.
Remember last value for next batch - This choice is only available for Text or Numeric Trace Fields. With this option chosen, the value entered into the Manual Input Screen during the last session will automatically populate the fresh screen during the next session. This value can be changed if necessary, but in many cases, it is a good starting point, making it quicker to input data.
Manual Characteristic Options
Characteristic Entry - There are 3 choices for this option:
- Normal Numeric Entry > With this option, the operator will type in the numeric value for this characteristic.
- Enter as Pass or Fail > With this option, the operator will be given a choice of “Pass” or “Fail” only.
- Enter as Pass or Fail with N/A option > With this option, the operator will be given a choice of “Pass” or “Fail” or “N/A”.
Default Value - This is simply the default value of the characteristic. When the screen launches, cells with default values are pre-populated, allowing the operator to change them if needed.
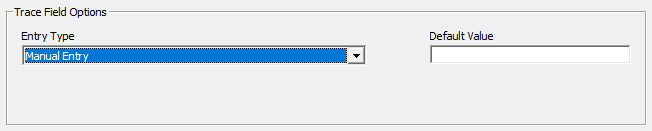
Trace Field Options
Manual Entry - This option gives the operator a box to type into and does not do any validation on what is entered.
Default Value - This is simply the default value of the trace field. When the screen launches, cells with default values are pre-populated allowing the operator to enter the data only if it changes.
Choose from list - This option allows you to force the operator to choose the value from a list. This is useful for repeating values such as operator names or machine numbers where there is a finite list of items from which to choose. It helps to provide consistency in your data, making filtering easier later. Choose the list to use to the right of the Entry Type setting and you can optionally choose the Default Value from that list to display to the operator.

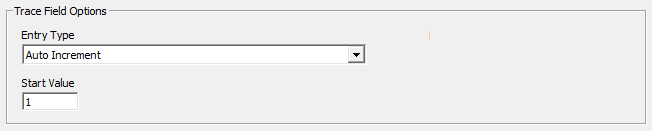
Auto Increment - This option will use the Start Value setting and add one to it for each record collected. This will continue incrementing through time and the operator will not be prompted to enter any values or even see that this is happening.
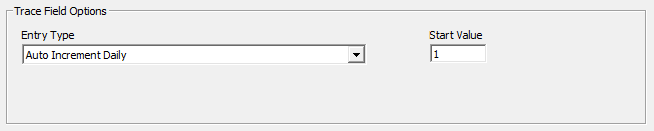
Auto Increment Daily - This option is like the Auto Increment option above, but the counting resets at midnight and uses the Start Value again for the first record collected each day. The user will not see this value or be prompted for any information.
Enter List - The Enter List option allows you to paste in a list of values to be used for each record as it is received. If you have a list of Cavity values (1/3/5/7/9) for example, you can choose the “/” Delimiter on this screen, then paste that list of numbers into the Manual Input Screen when it appears. The “1” value will be saved for the first record that is received, then “3” for the second record and “5” for the third…

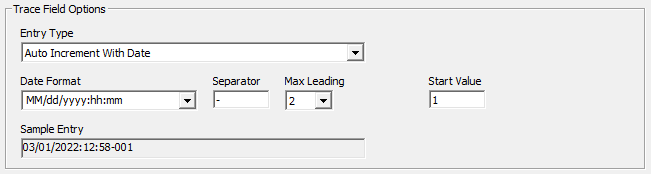
Auto Increment with Date - Text Trace Field Only – This option combines saving the current date (and optionally the time) with an incrementing number. The picture below shows that the Date and Time will be saved, followed by the incrementing number that will have a maximum of 2 leading zeros. With a Start Value of “1” the “001” is the first value for that incrementing number. This will not be shown to the operator at all and will just be added to the records as data is collected.
Auto Increment From Start Point - With this option, the operator will be prompted to enter the starting point for each batch. From that starting point the value for each record will be incremented from the previous value.

Turning Manual Input On/Off
Select Tools > Manual Input to turn on and off the Manual Input functionality. Depending on what was chosen in the screens, either the Set Up Manual Input configuration or the Set Manual Input Defaults are immediately employed.