Prerequisites
Create a part file by running your machine and inspecting a part.
Introduction
This article will describe how to set up a calculated characteristic in QC-CALC Real-Time.
In this particular example, we'll create a calculated characteristic that plots the area of a rectangle using the "actual" values from the first two characteristics in an existing file (length x width). This simple example will show you how to do this.
Directions
Adding the Calculated characteristic
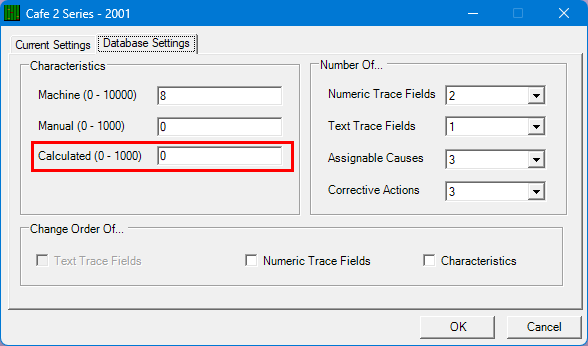
- In QC-CALC Real-Time, go to File > Properties... > Modify Database Structure...
- In the Modify Database Structure screen, go to the Database Settings tab.
- In the Characteristics area, enter a "1" into the Calculated box.
- Click OK.
- In the Characteristics window that appears, click Select All on the left side and then click the > button to move the characteristics to the list on the right.
- Click OK.
A new plot will be drawn in your file called Calculated Characteristic 1. By default, all values will be set to zero for now.
Setting the Nominals and Tolerances
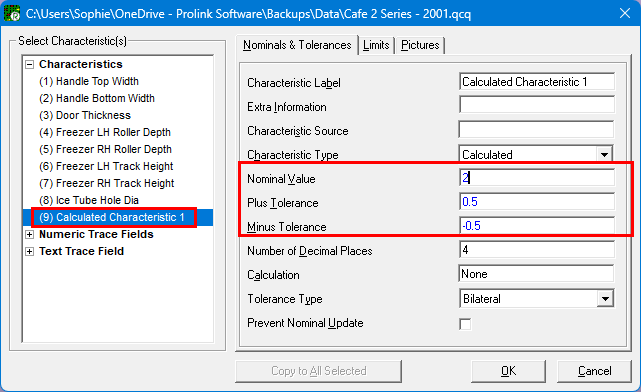
- Use the File > Properties... > Edit Nominals and Tolerances... menu and highlight the "Calculated characteristic 1" item in the Select Characteristics list on the left.
- At the top of the Nominals & Tolerances tab, set the Characteristic Label value to a more appropriate label than "Calculated characteristic 1". For this example, we'll name the characteristic "Area".
- Set the Nominal to your expected nominal value.
In this example, the nominal for the width is 2.0 and the nominal for length is 4.0. Therefore, I'll make the nominal for my area = 8.0. - Set the Plus Tolerance and Minus Tolerance to some reasonable numbers given your calculation.
- When finished, find the Calculation item towards the bottom of the list.
Setting Up the Calculation
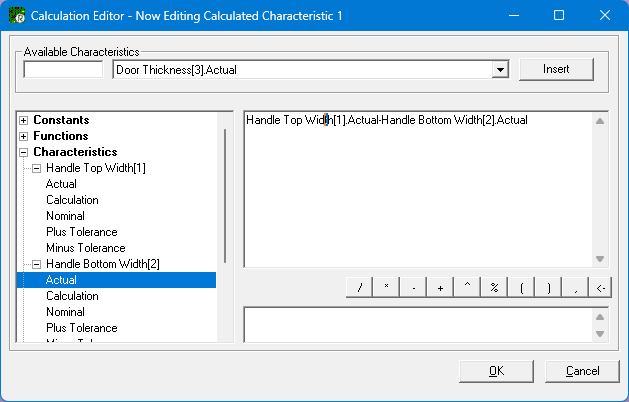
- Click on the box to the right of the Calculation item in the list, and the Calculation Editor will appear.
- Expand the characteristics list, then the first characteristic in the list, and double-click on Actual. This will add it to the calculation on the right.
- Now type * or click the button for it.
- Finally, expand the second characteristic in the list and double-click on Actual.
- Click OK in the Calculation Editor window.
Your equation should now say: Length[1].Actual*Width[2].Actual
NOTE: Make sure there are no extra spaces in your equation or the screen will not recognize the equation and will not allow you to click the OK button.
Finishing Up
- Click OK in the Edit Nominals and Tolerances... window to save your changes.
- Place your mouse anywhere over your calculated characteristic, right-click, and choose Update Calculated Characteristic.
Conclusion
Your calculated characteristic is now ready. Whenever you collect data and new points are added to the Length and Width fields, your Area characteristic will automatically update with the correct value.