PREREQUISITES
SQL Server 2005 and access to set up login accounts. Also, be sure you are running SQL Server in "mixed" mode. Check the related article for instructions on how to do this.
INTRODUCTION
This is a quick step by step list of how to create SQL Server users for your database. If you use the Create Database button in EDL or ERS, then this is not necessary because those products create a login ("qccadmin") for you that has the correct permissions.
Regarding permissions, users of EDL and ERS will need db_datareader and db_datawriter privileges on the database. These steps will walk you through creating the account so this is true.
STEPS
First, you need to understand how SQL Server handles user accounts and security. As you probably already know, each server has a set of multiple databases allowing you to store different types of information from multiple applications. Each database has its own set of permissions. Therefore, you need to set security first at the server level and then at the individual database level. This makes sense since not all users who have access to the server will have access to every database on the server.
At the server level, there are logins. Logins are accounts that have access to the server generally. Creating a login simply establishes the ability for a particular user to connect to the server. It does not necessarily give the user access to any one database.
Once a login has been created, you can add the login to any individual database by creating a "user account" in that particular database. A user account simply points to an existing server login and then gives specific permissions to the tables and other objects in the database.
- In SQL Server Management Studio, connect to your server using File > Connect Object Explorer. Once connected, your server will appear in the explorer panel on the left side of the screen.
- Expand the tree on the following path: [Your Server Name] > Security > Logins.
- Right click on the Logins folder icon and choose New Login.
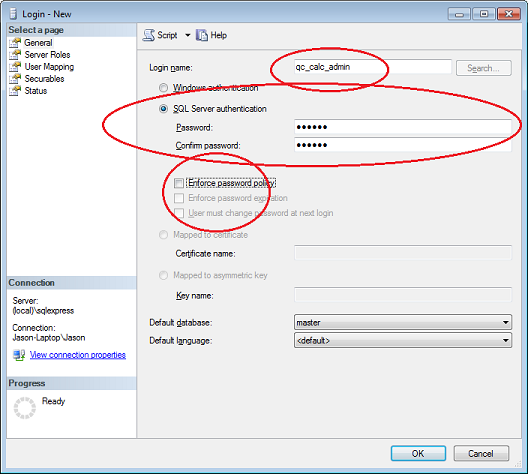
- On the New Login screen, type the name of the login at the top, choose SQL Server Authentication, and uncheck Enforce Password Policy. Click OK when finished.
- Now that you have created the server login, let's add the login to your database. We'll assume the name of the database you created is called "qc_calc".
- From the top server node, expand the tree on the following path: [Your Server Name] > Databases > [Your Database Name] > Security > Users.
- Right click on the Users folder icon and choose New User.
- On the New User screen, type the name of the login twice at the top and check db_datareader and db_datawriter in both the Schemas and Database Roles lists.
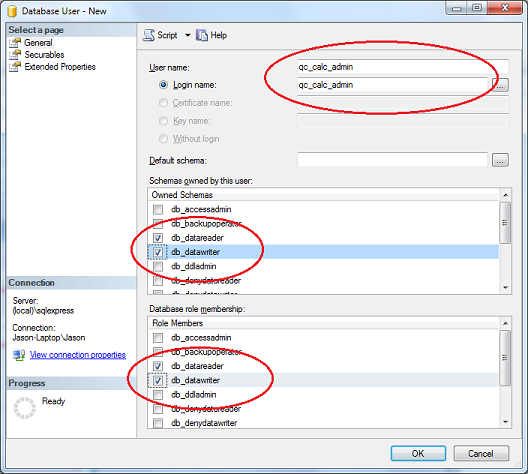
- Click OK when finished.
You are now finished and the user account is ready to use. A couple things about the settings above.
- If you receive an error creating the login, it may be because you are not in mixed mode. See the related article for details on changing this at the server level.
- We unchecked Enforce Password Policy because the user you are creating is to be used by applications that run unattended. If you allow password policy to be enforced, the password will eventually expire and the applications (EDL/ERS) will no longer be able to get to the database. This will cause errors and headaches and it not recommended. If you want to change the password on an interval due to IT policy, it is recommended you do so manually so you can control the situation. For example, change the password in SQL Server, then go to all installations of EDL and ERS and update them immediately. This way you avoid a potential "production down" situation.
- We checked db_datareader and db_datawriter rather than giving specific permissions to any tables. This was done because SQL Server has provided some handy standard groups automatically. Users in the db_datareader group automatically have read access to all tables in the database. Users in the db_datawriter group automatically have write access to all tables in the database. Neither group has permission to create, delete, or modify the tables themselves.
MORE INFORMATION
If you want to secure the database further, EDL needs read/write access to all tables that do not start with "ers_". ERS needs read access to all tables in the database and write access to all tables starting with "ers_". This is as of version 3.3 of both products. However, since most issues and headaches are caused by permission problems, it is not recommended that you try to get to granular with the permissions. Keeping them simple makes them easy to change later.