INTRODUCTION
From time to time, we are asked about how to deal with balloon numbers from the print. Specifically, the balloon numbers rarely match one to one with the dimension numbers in the CMM. As such, people want to somehow enter and subsequently report these numbers rather than the dimension numbers.
This is a related article to adding balloon numbers to your QCC file. However, this article discusses actually placing the balloon numbers into your Excel report via an Excel Job in the Buddy.
STEPS
- In Excel, open your template spreadsheet. In my case, my dimensions will be in a column so I will create a list of them. Add the tags where you will want the list of balloon numbers to be placed.
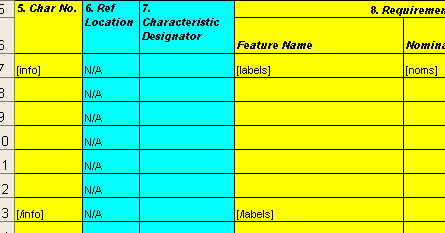
In my case, I added [info] and [/info] tags in the Char No. column. You'll notice the Feature Name column just to the right where I'm going to place a list of feature labels.
- When finished, save your Excel template spreadsheet.
- In the Buddy, either edit your existing Excel Job or add a new one. When you get to the replacements, add a replacement for the
[info] tag and choose {All Feature Extra Info Fields} from the Part Data category.
You're done. When you run the Excel Job, the values (balloon numbers) in the Dimension Information fields will be placed into the spreadsheet between the [info] and [/info] tags.
MORE INFORMATION
This example used balloon numbers in the Dimension Information field. Please note that you are not limited to this. You can place any data into the Dimension Information field and report it in the Buddy.
PLEASE NOTE: The Buddy does not sort data in Excel. Therefore, if you are using balloon numbers they will most likely be added out of order since the dimensions are added in numeric order based on data collection.
Fortunately, Excel can sort the data for you fairly easily. First, run the job and add the data to the Excel spreadsheet to create your final report. Then, simply highlight the entire block of cells you want sorted excluding any header rows. For example, if you look at the picture above from Excel, you will want to sort the feature labels along with the balloon numbers, so you would highlight the entire block including the labels. Then choose Data > Sort... from the menus in Excel.
On this sort dialog that appears, choose the column on which you wish to sort (in this case the column with the balloon numbers), choose Ascending or Descending, choose No Header Row, and click OK. Your data will be sorted by balloon number and kept together with the labels, values, etc.