SYMPTOM
We often get customers who start with QC-CALC and eventually move into SQL Server via EDL. At first, everything seems to go well, but eventually the list of QCC files in ERS becomes extremely long. This is a normal result of suddenly combining a lot of QCC files from different locations into one place.
RESOLUTION
One easy way to solve the issue is with user groups in ERS. There are a couple of aspects to making this work, so I'll list the sections here. The basic idea is to segregate your QCC files into various groupings using the EDL description. Then assign your user groups to those EDL descriptions thereby (a) limiting data access for each user and (b) reducing the size of the list for each user by removing parts that are not relevant to his/her job.
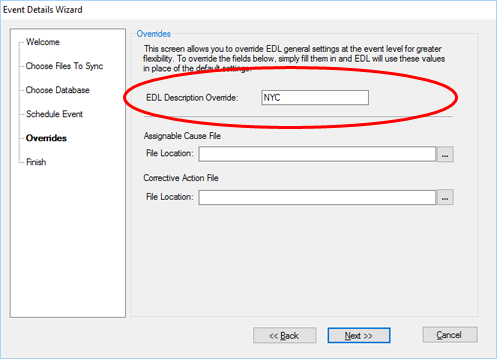
1. Setting up EDL Descriptions
The first step is to break your QCC files into segments by whatever logically makes sense for your company. If you have one plant, department or team may make sense. If you have multiple plants, you may want to use a combination Plant-Dept code. Once you've determined this, create separate EDL Load events for each segment. While editing each event, specify the EDL Description as an override on the overrides screen in the event wizard. Once you do this, all files uploaded by that event will be tagged with the corresponding EDL description. NOTE: Changing this on an existing event will automatically update all QCC files associated with the event even if there is no new data to upload from the QCC file. This makes it easy to "fix" the situation or re-organize after you have already uploaded all of your files.
CAVEAT: If you are storing all of your QCC files in the same directory, you may want to consider moving them to subfolders by the same segments (team, dept) to match your load events since it will make it easier to track.
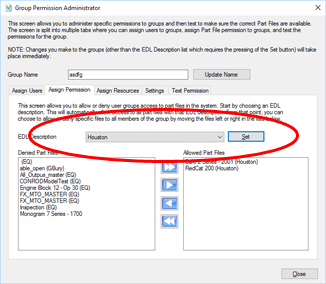
2. Create User Groups in ERS
Create the corresponding user groups in ERS for each segment via Tools > Administrator. a. In the Permission > Group Permission section, create groups with the plus icon.b. Specify a name.c. Choose the EDL description on the Assign Permission tab.d. Click Set to set the EDL description. 3. Turn on Group Permission Restriction in ERS - In the Permission > General Settings, check the box at the top that says "Use group permission to restrict part file access throughout ERS" and click OK.
4. Assign your users to groups
Create/Edit your users and assign them to as many groups as each needs access to files.
MORE INFORMATION
Remember that each group in ERS can only be associated dynamically with one EDL description. However, users can be in more than one group. As such, you can assign your Administrator to all groups to ensure full access. CAVEAT: Once you turn on the "Restrict part file access.." checkbox in ERS, all new users will see no QCC files in ERS until they are assigned to a group. The first time each users logs in, the screen will show a message saying that ERS is in this mode and to contact his/her admin to get assigned.